Quick guide to get started with JIRA Cloud

Check our updated blog post on how to get the most of Jira Cloud.
The Cloud-based Atlassian platforms are getting more and more popular among small and middle size businesses. Atlassian Cloud is the hosting used for delivering Atlassian applications as a service. If you intend to start using JIRA Cloud for issue tracking and project management, either migrating from JIRA Server or being totally new to JIRA, this post will help you save some time while making your first steps as a JIRA administrator.
To start using JIRA Cloud, you need to set up a free trial or get a paid subscription. Free evaluation lasts 7 days and can be extended to 14 days. You can cancel your trial at any moment. If you are satisfied and decide to continue using JIRA Cloud, you need to add payment details in your my.atlassian.com account to get a paid Cloud subscription.
JIRA Cloud is available in three options:
- JIRA Core for business teams
- JIRA Software for software development teams
- JIRA Service Desk for IT helpdesk teams
You can pick one or several options at once depending on your needs. In this article we will be using JIRA Software as an example.
Starting a free trial
To start a free trial, you need to:
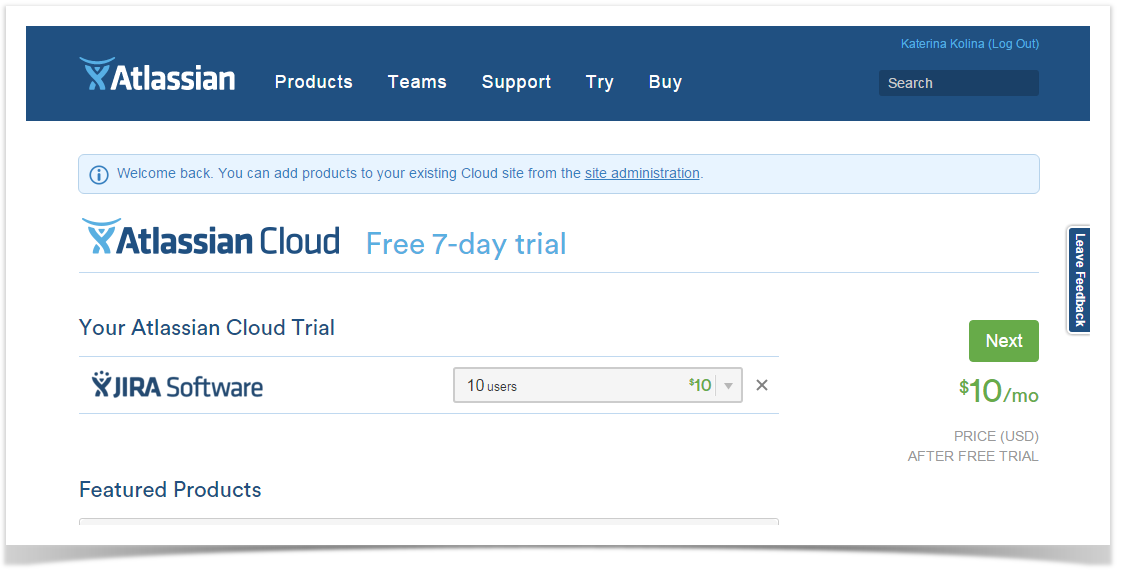
1. go to the Atlassian Cloud Free 7-day trial sign up page;
2. check what applications are listed in the “Your Atlassian Cloud Trial” section to make sure there is JIRA Software and no applications you do not want to try at this time. Delete not needed applications, if any;
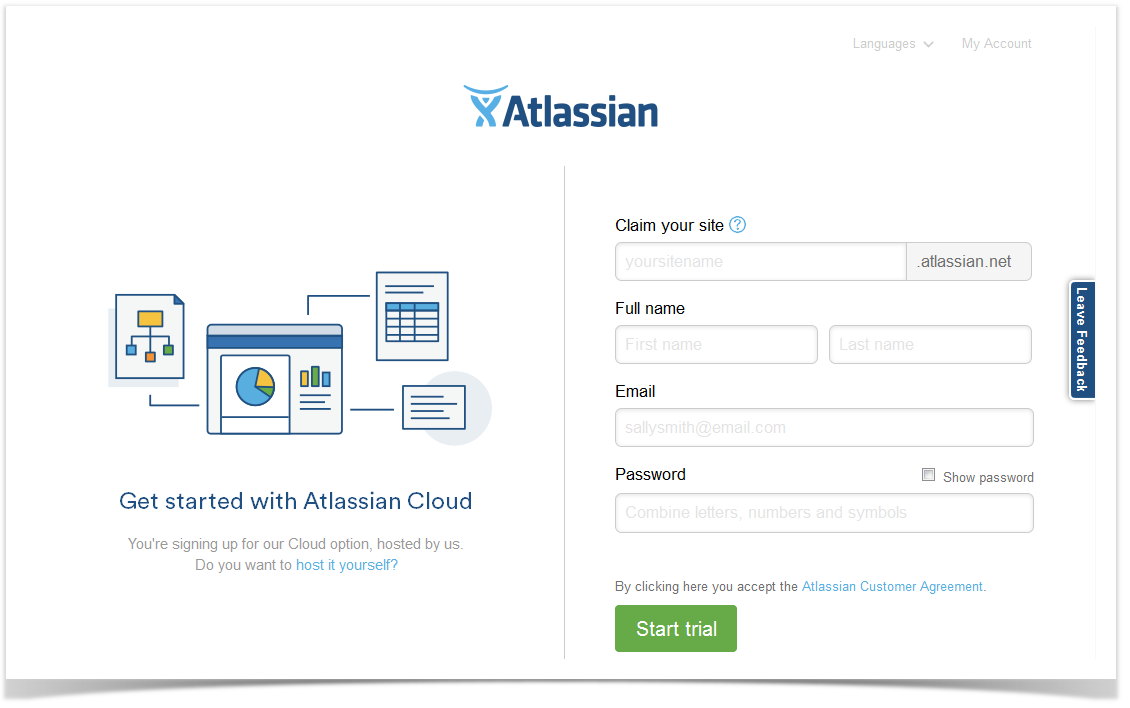
3. click ‘Next’ and set up your trial: provide the name for your site, your full name, email and password, and press ‘Start trial’;
4. wait for a couple of minutes for your site to be set up. Once it is ready, you will see the log in page and receive a signup email.
Logging in to your JIRA Cloud site
To log into your JIRA Cloud site:
1. navigate to https://<site_name>.atlassian.net, where <site_name> is the name you entered during the signup;
2. enter the email and password you used while signing up.
Initial steps
When you log into JIRA Cloud for the first time, you will be prompted to choose your language and avatar, and take a quick tour to learn about JIRA basics.
There is a lot of valuable and helpful information in Atlassian Documentation on how to get started with JIRA Software based on your needs. Below are some of the major steps.
User management
You can start out by creating users and user groups, so that members of your team who will be using JIRA got user names and passwords to be able to log into JIRA and work in it; and a JIRA administrator could configure what actions different users or user groups can perform in JIRA. Actually Anonymous access is also available in JIRA, but in most cases you want only certain people to have access to it.
To create users and user groups:
1. navigate to ‘User management’ in Site Administration;
2. select ‘Groups’ on the sidebar and see the list of the predefined groups. If needed, create new groups suitable for you (e.g., jira-human-resources, jira-marketing) by clicking the ‘Create group’ button and entering a group name;
3. to add users, go to the ‘Users’ tab, type in full names and email addresses of people you would like to add as users and click ‘Create users’. You can create three users at a time. User name is generated automatically. After creation, a new user will be added in the table of users and a person you created a user for will receive an email notification with the link for setting their password;
4. new users are automatically included in the group that is set as a default one. If you would like to add a certain user to some other group, click that user’s full name on the list of users. On the page that opens, click ‘Add group’, find and add a needed group. While on this page, you can also edit user details, deactivate or delete a user and perform other operations;
Read Manage users and groups in Atlassian Documentation to learn more.
Creating projects
In JIRA, work is organized in projects. A project is a collection of issues. To start working in JIRA, you need to create a project:
1. click ‘Projects’ in JIRA header and select ‘Create Project’;
2. select the type of the project you need. Each project type includes a specific set of features;
3. enter project name, select a project lead and submit.
Your project will be built based on the type of the project you have chosen. In this example we used a ‘Kanban software development’ project type. This project comes with a Kanban board and a basic Agile workflow.
When a project is created, you can configure and tailor it to your needs and requirements. You can access your project configuration either while browsing a project by clicking on the left-hand sidebar or by selecting a project on the Projects page.
On the left-hand sidebar you will see tabs with various settings, such as:
- Project details
- Issue types
- Workflows
- Screens
- Fields
- Roles
- Versions
- Components
- Permissions
- Notifications, and others
You can read all about it in Atlassian Documentation. And here let’s take a look at some of the points: configuring issues, permissions and workflows.
Configuring issues
JIRA projects are populated with issues that your teams create, work with, track, resolve, etc. Issues can be bugs, feature requests, or other tasks. Each issue has multiple fields, such as ‘Summary’, ‘Description’, ‘Issue Type’, ‘Due Date’, ‘Priority’, etc.
JIRA is very flexible. You might want to adjust the default settings and, e.g. add some custom fields, change fields behaviour, create additional values for issue type, priority, resolution, and status fields, so that issue configuration reflected your teams’ processes.
Refer to Configuring issues for details.
Configuring permissions
Permissions define what actions users can perform while using JIRA. Using permissions you can restrict performing various operations to specific groups, project roles, or users. Besides global permissions that are system wide and apply to all projects, there are project permissions that can be set for individual projects.
Project permissions are organized in Permission Schemes. A permission scheme is a set of permissions, where each permission is granted to one or multiple user groups, roles or individual users. A permission scheme can be associated with one or several projects. Originally your project is associated with a default permission scheme. If it is not suitable for you, you can modify it or create a new permission scheme and associate your project with it.
Refer to Managing project permissions for details.
Configuring workflows
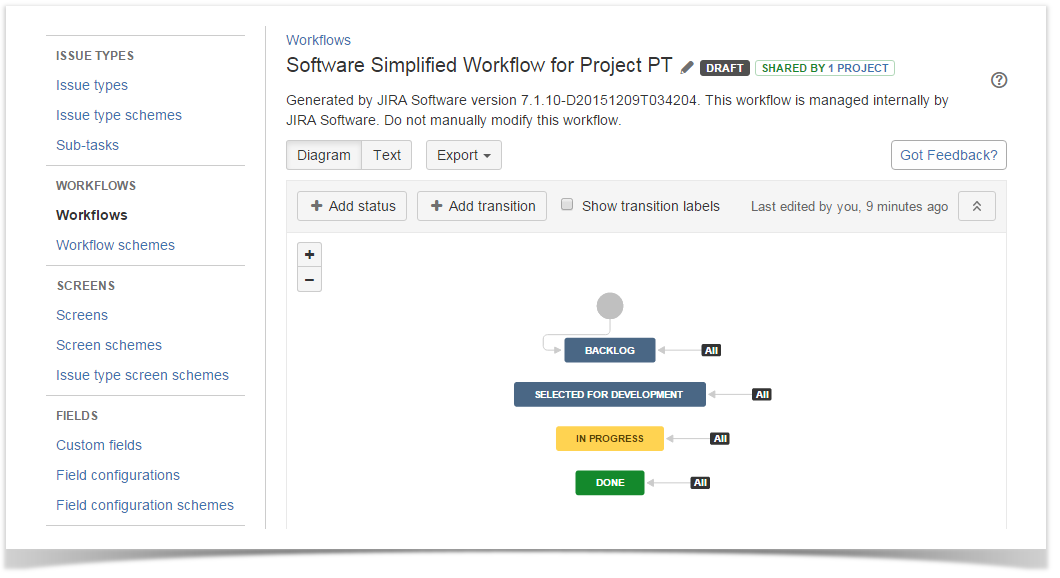
In JIRA, a workflow is a set of statuses and transitions. Statuses represent a task’s life cycle – different states an issue can have, e.g. ‘Backlog’, ‘Selected for Development’, ‘In Progress’, ‘Done’. Thanks to a workflow you can track the history and see the current state of a project or an individual task. It works best if a JIRA workflow matches the processes that exist in your organization.
When you create a new project, it has a default workflow. If you would like to adjust it to better fit your needs, you can copy and edit that workflow or create your own workflow. It is possible to associate workflows with specific projects and, if required, with particular issue types by using a workflow scheme.
Refer to Working with workflows for details.
Extending JIRA Cloud functionality with add-ons
JIRA is rich in features. However, if you realize that some capabilities that are essential for your processes is missing from JIRA, you can always search for an add-on on Atlassian Marketplace that would provide the additional functionality that you are looking for. You can search for a plugin directly on the Marketplace or when in JIRA, go to JIRA Administration, select ‘Add-ons’ and search for the right tool in the Universal Plugin Manager.
Helping your teams master JIRA
JIRA Cloud is very intuitive. But being so powerful, it comes with so many features and capabilities that it can be hard for people who are new to JIRA to embrace it right away. Detailed and comprehensive JIRA Cloud Documentation (check Getting started with JIRA Software), as well as courses available at Atlassian University can help your teams start getting the most of JIRA as soon as possible.
As another option, you can hire a company that is an Atlassian Expert and provides training and consulting services. They will be able to assist your staff while landing in JIRA and provide you with guidance and best practices of using this tool adapted to your use cases.
No secret that adopting a new software is mostly challenging for non technical teams. If that’s your case, you can think of getting JIRA Core for your non-IT folks. It has been recently introduced and compared to JIRA Software it is lighter in features excluding the functionality which is not needed for business processes and would be confusing for business teams.
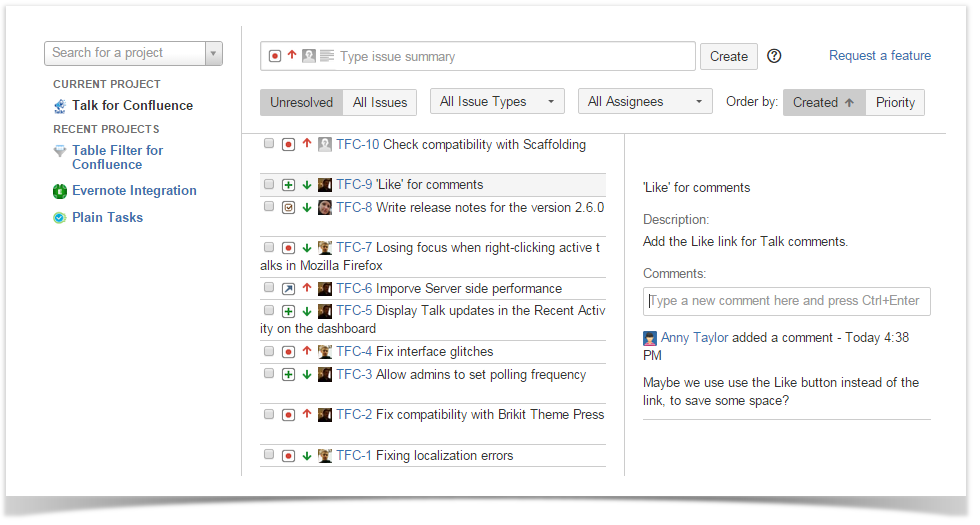
If you figure that even JIRA Core is too complicated for your non-tech people, you can check out one of the add-ons created by our team called Plain Tasks for JIRA. Among other benefits, it allows to avoid the complexity of JIRA by providing a new way to view, create and work with issues in JIRA projects. To be brief, Plain Tasks displays the issues of a JIRA project as a to-do list with issue details on the sidebar like on the screenshot below.
Adding new tasks and managing existing ones is very simple and intuitive for a user. You don’t need to deal with a workflow and click buttons to move from one status to another, just mark a checkbox to resolve an issue or clear a marked checkbox to reopen it. New issues are created on the fly by typing issue summary in the ‘Create issue’ field, setting issue details by clicking icons and pressing ‘Enter’. You can create dozens of new issues in no time while seeing the list of existing issues on the same page.
You can try it out for free and see if it helps you while introducing JIRA Cloud in your organization. If you evaluate Plain Tasks, we’ll appreciate you reaching out to us to share your feedback and experience, or post your feature ideas on the forum.
Hoping this article was helpful and gave you a general idea about getting started with JIRA Cloud. This topic is extensive and can’t be covered by one post, but the highlights and provided links can give you a direction for further exploration.
If you get any questions, feel free to ask them in comments below or email me at kkolina@stiltsoft.com.


