How to Automatically Add Checklists to Jira Tasks: Step-by-step Guide

The reason most teams intend to use checklists in Jira but don’t do so consistently is that it depends on someone remembering to add them at the right moment. The fix is simple: stop relying on memory and make checklists appear automatically.
This guide shows how to set this up using Checklists for Jira (Templates & Automation) and automatically add checklists to Jira tasks.
Step 1: Decide how you want to add checklists
The Checklists for Jira app offers two ways of adding checklists to automation rules:
- Using a checklist template that you’ve already prepared and saved
- Writing a checklist manually when setting up automation rules using checklist syntax
Let’s see how it works.
Option 1: Use a checklist template (easy to start with)
If your checklist doesn’t need to be updated constantly (for example, Definition of Done or QA steps), it makes sense to create a reusable template.
How to create a checklist template:
- Open any Jira task
- Create a checklist, give it a name, and add checklist items
- Once your checklist is ready, save it as a template

All your templates will be available in automation rules. And don’t worry, you can always manage templates later (e.g., add more items, edit existing ones, or delete them). Just click the checklist menu in your Jira task and choose the “Manage Templates” option.
This approach is great when you want something quick and easy to set up and maintain. But at the same time, checklist templates cover most of the use cases we have on our team.
Option 2: Add a checklist manually directly in Jira automation
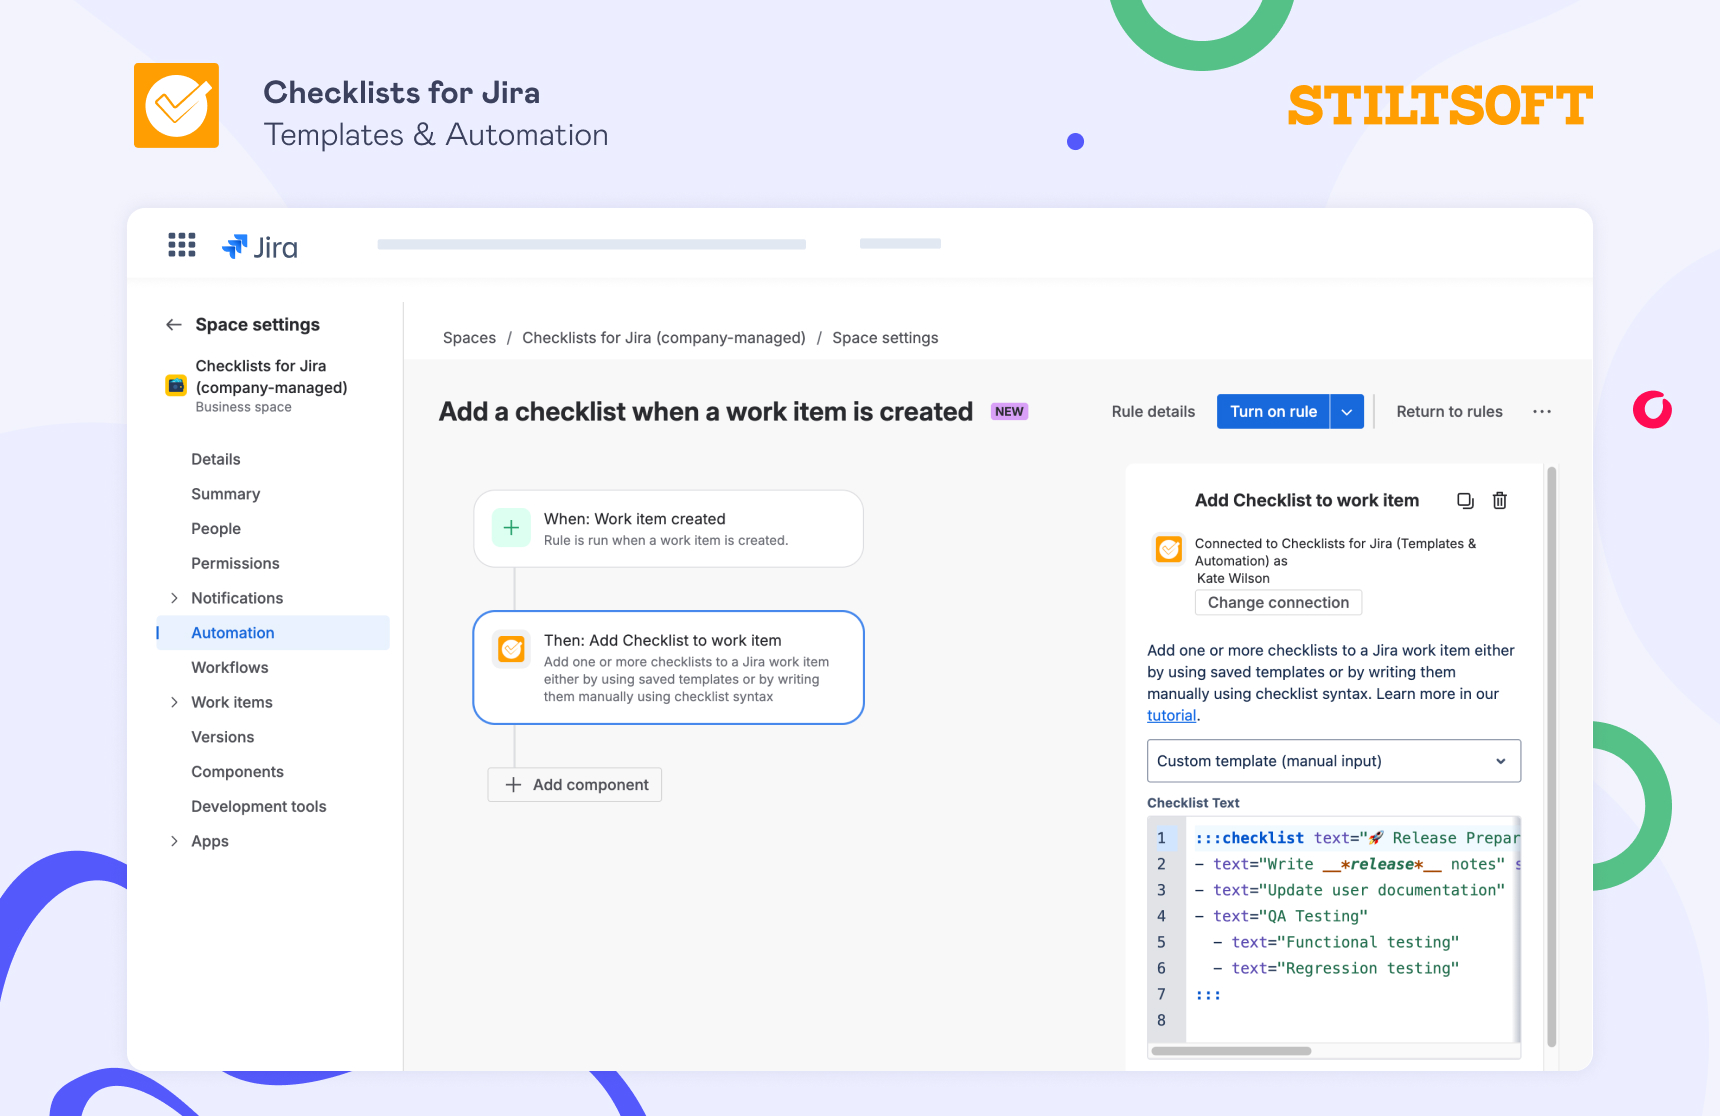
If you need a bit more flexibility, you can build a checklist directly in an automation rule using our special checklist syntax. This option comes in handy when the items should adapt to the task itself. For example, you might want to reference the issue key, or include a due date, or pull in other dynamic values. Since the syntax supports Jira smart values, you can make each checklist feel tailored to the specific work item instead of using the same static list every time.
Example of a simple checklist written via syntax:
:::checklist text="🚀 Release Preparations"
   - text="Write __*release*__ notes" status="checked" assignees="{{creator.accountId}}"
   - text="Update user documentation"
   - text="QA Testing"
     - text="Functional testing"
     - text="Regression testing"
:::
Result:

Thus, it’s better to use this option when checklist templates are too static for your workflow.
Step 2: Set up Jira Automation to add a checklist
After creating a checklist template or deciding to add it manually, the next step is to set up an automation rule for your workflow. Here is how:
- Navigate to Space settings.
- Open Automation.
- Click Create rule. You can create a rule from scratch or use predefined templates from Atlassian.

Next, you need to define when your checklist will be added.
Step 3: Choose a trigger to automatically add checklists to Jira
The first thing you need to do for every automation rule is define when your checklist should show up. Here are the most popular examples of triggers that many teams stick to:
- Work item created (e.g., to include a Definition of Done from the start)
- Work item transitioned (e.g., for QA or Testing checks to show up exactly when they’re needed)
- Scheduled (e.g., for some recurring reviews)
On top of that, you can make the rule more precise by adding conditions to your triggers.
Step 4: Add the checklist action
And here comes the key step to define a checklist that a rule will automatically add to your Jira work item:
- Click + New component.
- Choose THEN, add an action.
- Select “Add Checklist to work item”.
- Connect Jira Automation with Checklists for Jira (Templates & Automation).
Now you choose how to add the checklist:
- Select your saved template from the dropdown if you’re using a template.
- If you plan to add a checklist manually, choose the Custom template (manual input) option (selected by default), then type your items using the checklist syntax.

Final thoughts
As can be seen, setting up rules to automatically add checklists to Jira tasks is not as difficult as it might seem if you use the Checklists for Jira app. You don’t need to configure custom fields or dig through app settings to find the right template. Just create a template in your Jira task and, with a few clicks, set up automation that saves time and ensures no one forgets important steps.