How to Produce Better Internal Documentation Using Comala Workflows and StiltSoft Talk

December 21, 2017
#Confluence#Collaboration
11 min

This blog post was created in cooperation with Mike Rink – Product Evangelist at Comalatech. We will show you a better way to update your public content discreetly preventing anonymous users from viewing your drafts and internal discussions.

Atlassian Confluence is a team collaboration platform that helps you create, share, and keep your information in one place. Teams who choose it discover improvements to internal communication, document management, and project development processes.

But Confluence is more than a document repository. A number of companies have found Confluence to be an extremely effective tool for knowledge sharing, specifically as an extranet site for public documentation. Many Atlassian Vendors use Confluence as a product documentation portal to share essential information about their apps with their current and potential customers.

For companies that need to communicate internally, Confluence can be configured as an intranet site to share information with teammates who don’t have an account in Confluence. In this case only members of your corporate network can access your Confluence site, but the information is still shared with stakeholders. It can be a great solution for large companies where only certain departments can log in to Confluence and other employees have read-only access to Confluence spaces.

Whether working on public content using Confluence as an extranet or an intranet site, both have one thing in common: the number of content editors is smaller than the number of information users. The editors may encounter difficulty in updating the content discreetly because any change they make or any inline comment they add to the public content in Confluence will be visible for anonymous users.

In this blog post, you will discover how two apps, Comala Workflows and Talk – Advanced Inline Comments, help teams to update public content internally, preventing anonymous users from viewing drafts and internal discussions.

Issue Overview

Consider a common case when HR departments produce Confluence content, and other employees in the company have read-only access to the information the HR team shares.

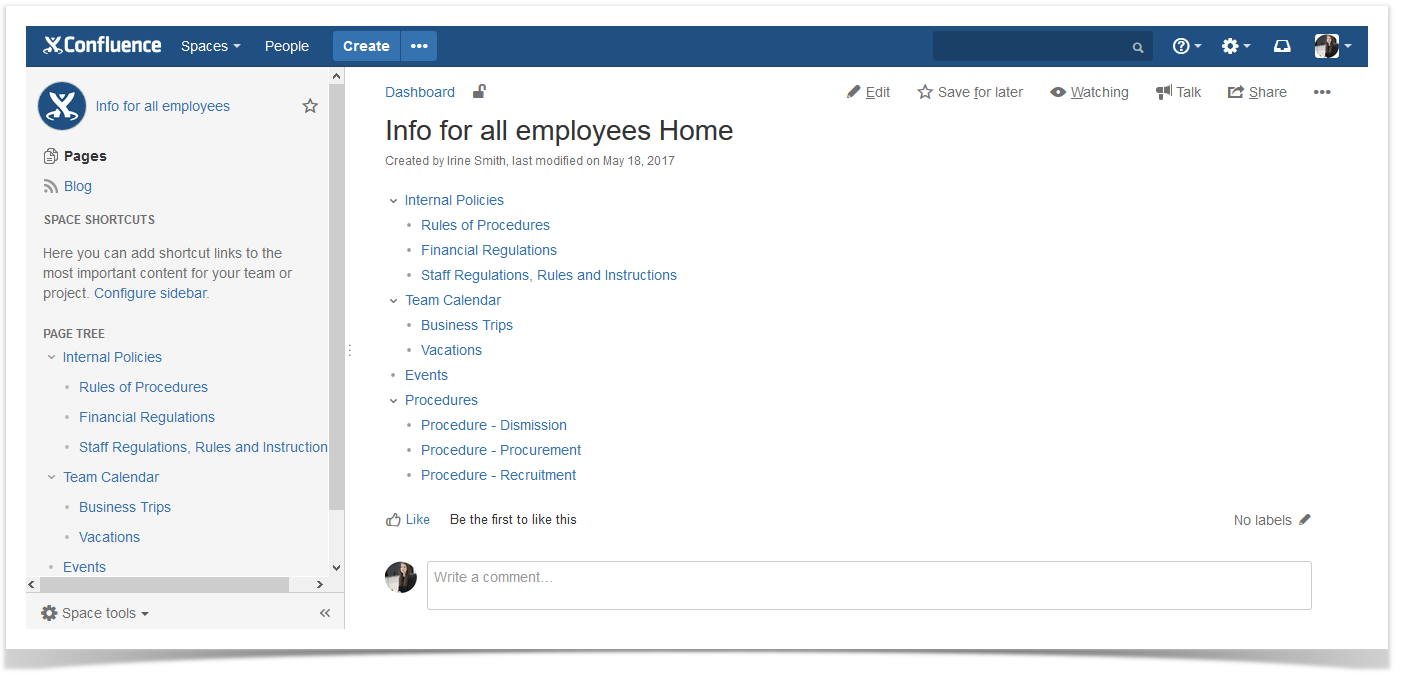
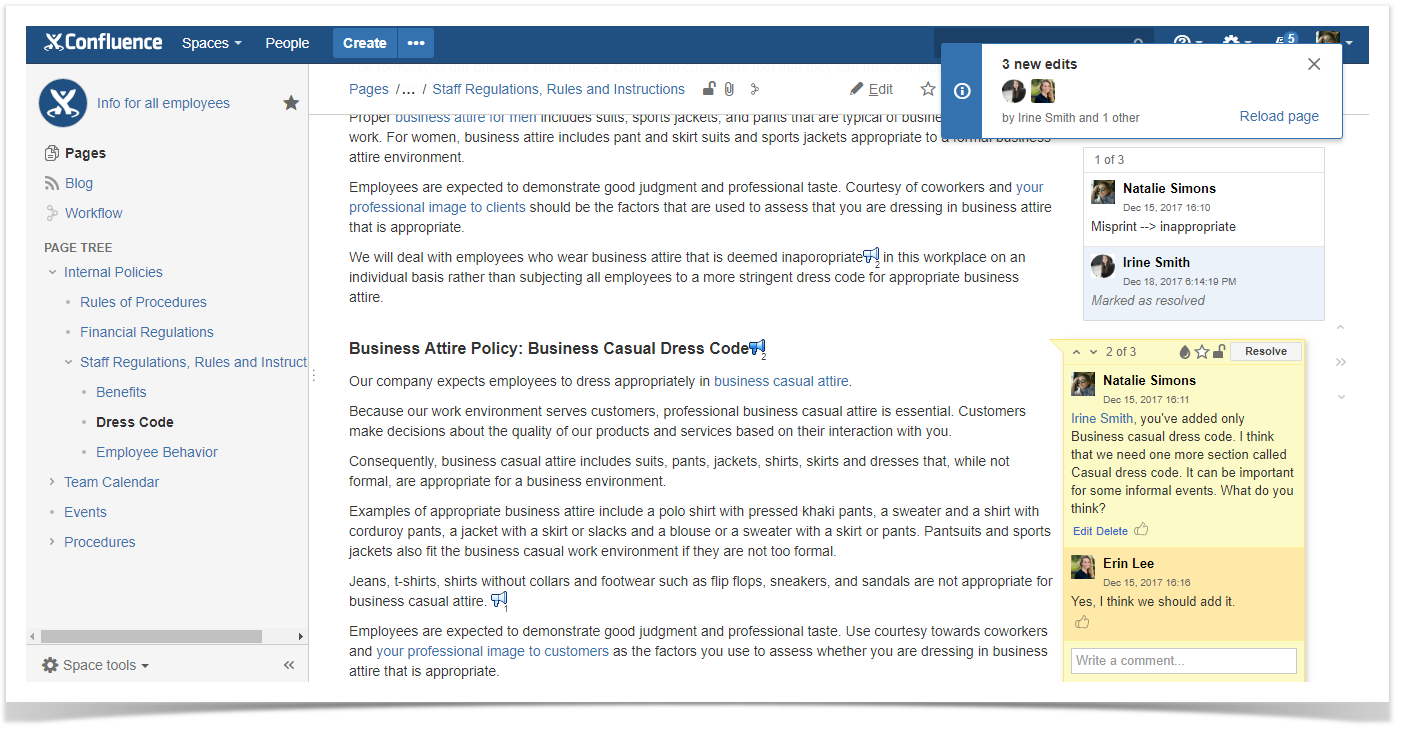
In the example below, the public space is called “Info for all employees”. This means that everybody in the company can view any page in this space.

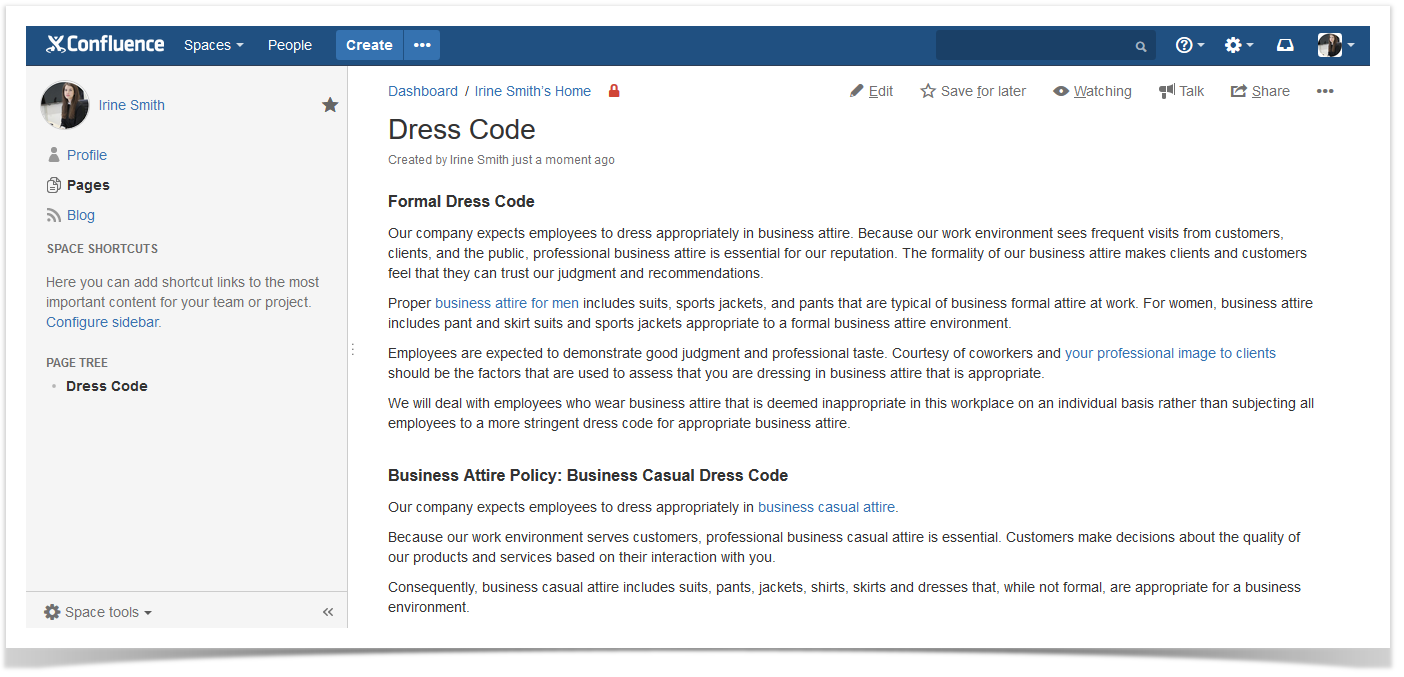
In this case the management team asked the HR department to edit the Staff Regulations, Rules, and Instructions page. They need to describe their company’s new dress code policy, add information about the benefits the company offers, and explain what the term ’employee behavior’ means for their company.

The editors have a lot of things to discuss in private while writing. Unfortunately, the native comments in Confluence have no viewing restrictions. Moreover, any update made to the content will be immediately visible to the employees.

So what is the best way to prevent the employees from viewing the drafts and internal discussions?

The Inefficient Way

Imagine that the HR team doesn’t use any Confluence apps.

In this case they will need to keep all drafts either in a separate space with viewing restrictions or use a separate Confluence instance. Otherwise all the changes made to the content are visible to everybody.

When they are ready to publish this page, they will need to copy and paste it, or move it from this space to the public one.

If they copy the content from another Confluence instance, they will spend even more time and effort. Especially when the document contains pictures, because they will need to insert them manually in the public page.

The HR team needs to add three new separate documents. This means that they will repeat the process with moving their content to the public space at least three times, tripling the effort required.

Another problem is that they can’t discuss the content discreetly in the public space. They need to resolve all comments before they move the page to the public space because Confluence native inline comments have no viewing restrictions.

The HR team will also spend extra time resolving comments because:

  • The page shows only one inline comment at a time;
  • The editors do not see the comments in the edit mode;
  • The editors can add and resolve comments only in the view mode.

As you can see, this process is time-consuming and bit tiresome if the team doesn’t use any apps. The good news is that there is a better way to fulfill this task.

The Better Way

We will show you how to work on the documents right in the public space using Comala Workflows and Talk – Advanced Inline Comments.

Comala Workflows

This useful solution from Comalatech helps the HR team ensure the content shared is approved, while allowing users from other teams to see the last approved version of the page.

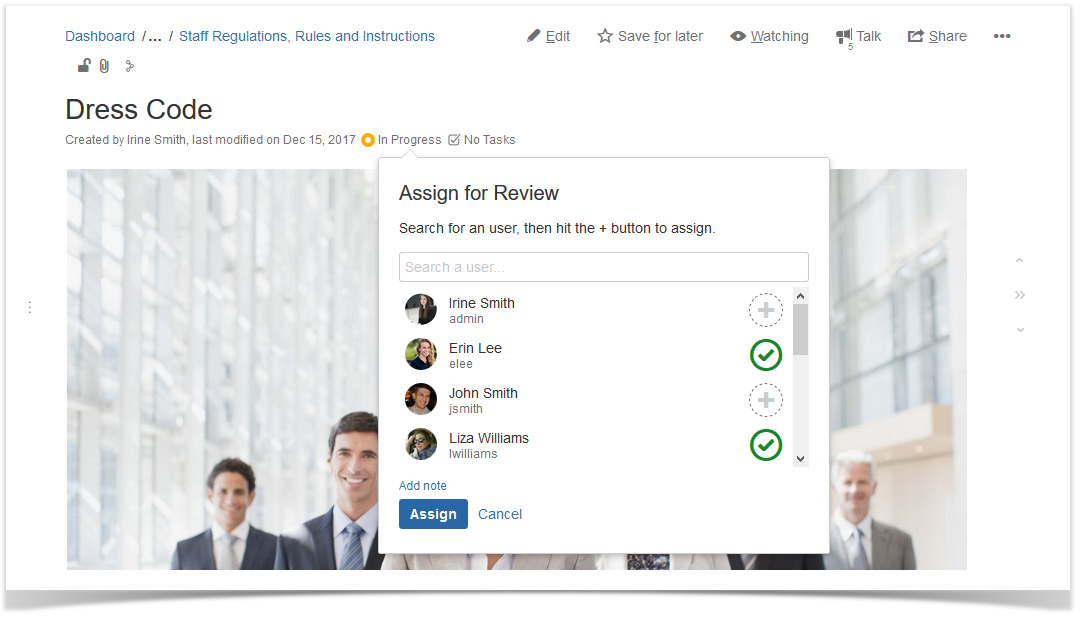
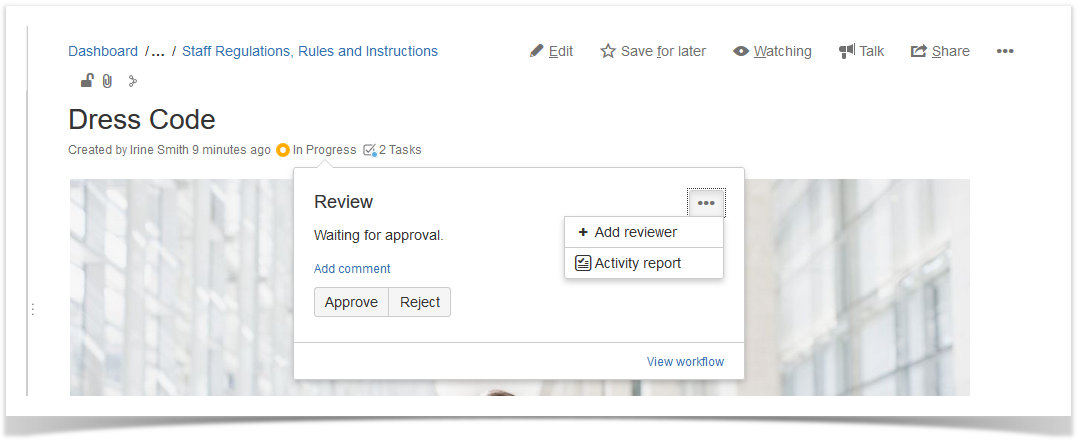
They start by applying a workflow to a page. Next they assign team members to review, approve, and publish pages.

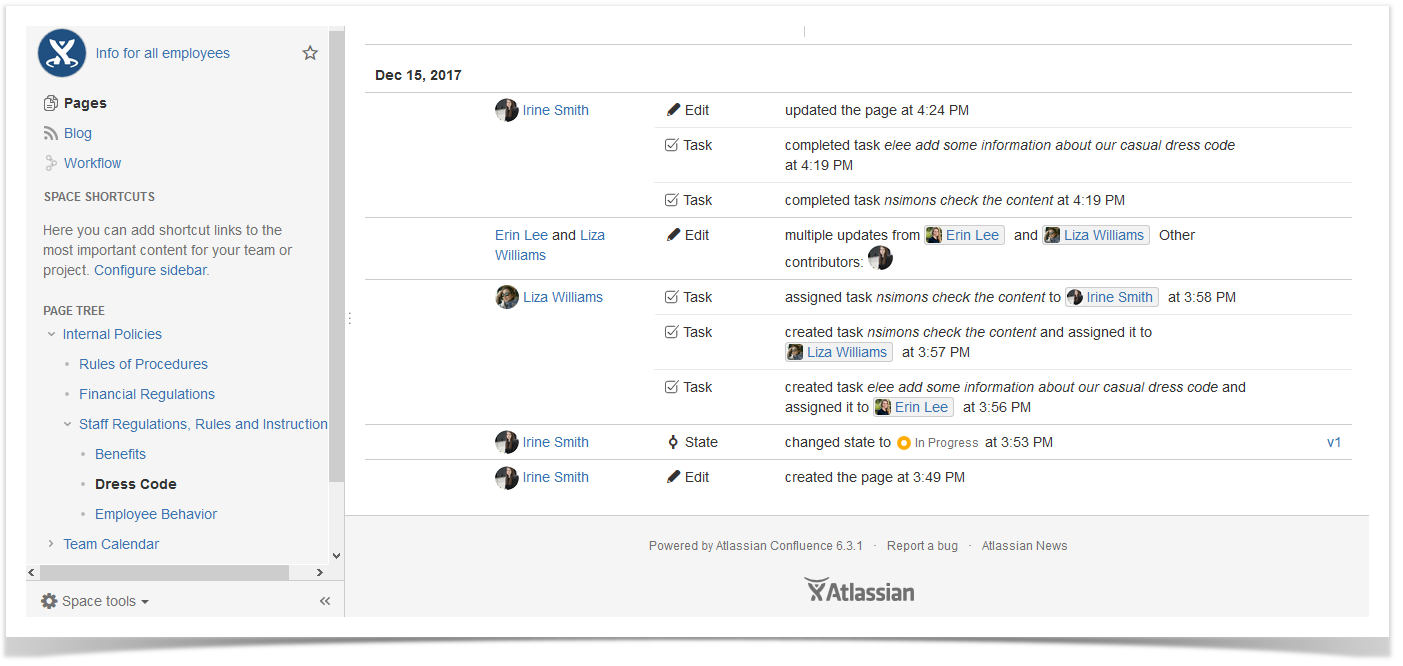
When the status of the page is ‘In progress’, the content is available only to the editors.

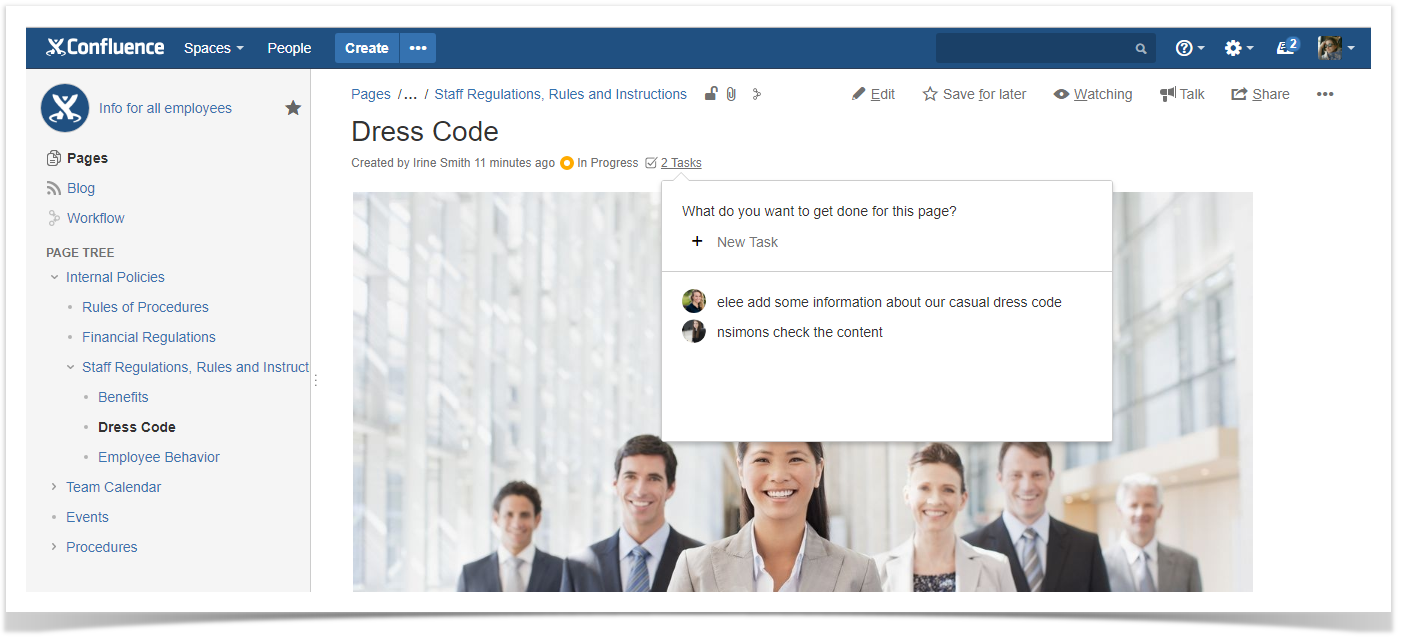
They can add tasks for their colleagues.

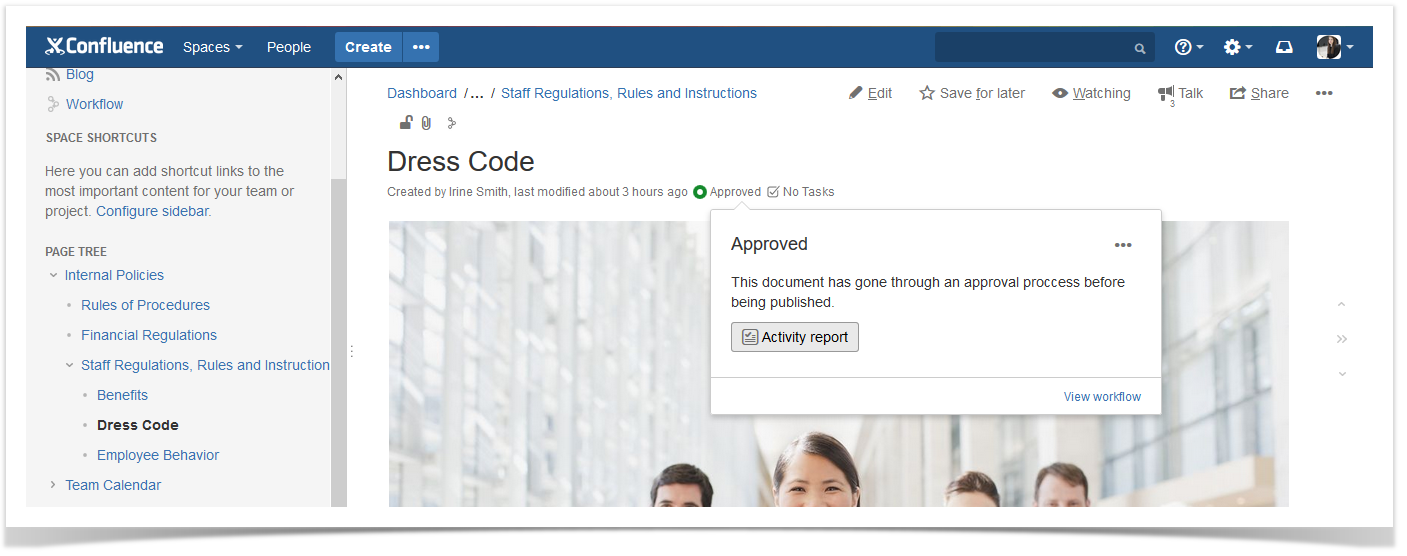
Users that can not edit the page will not see the content until it’s been approved and published. Editors can confidently edit documents, because users outside the editing team will always see the last approved version of the page.

This app allows the HR team to track all the updates of the page.

This way the Comala Workflows app simplifies the whole process. Now the editors can manage three new pages in the public space.

Talk – Advanced Inline Comments

This powerful tool from StiltSoft helps users add inline comments (talks) that have a wider set of capabilities than the native inline comments in Confluence.

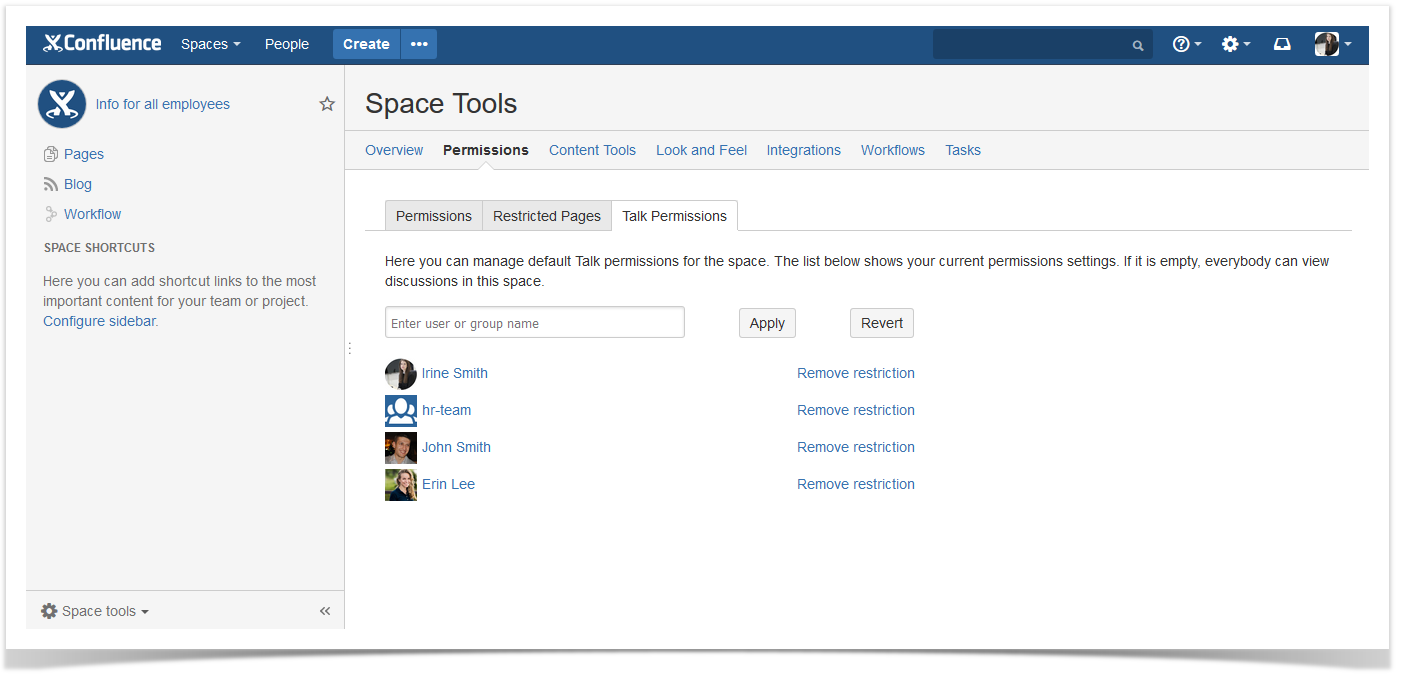
Now the HR team can set default space viewing permissions applied to all the talks created within the space. They can add either the whole group of users or certain users. With the help of this feature any conversation of the HR team on a public page in this space becomes private.

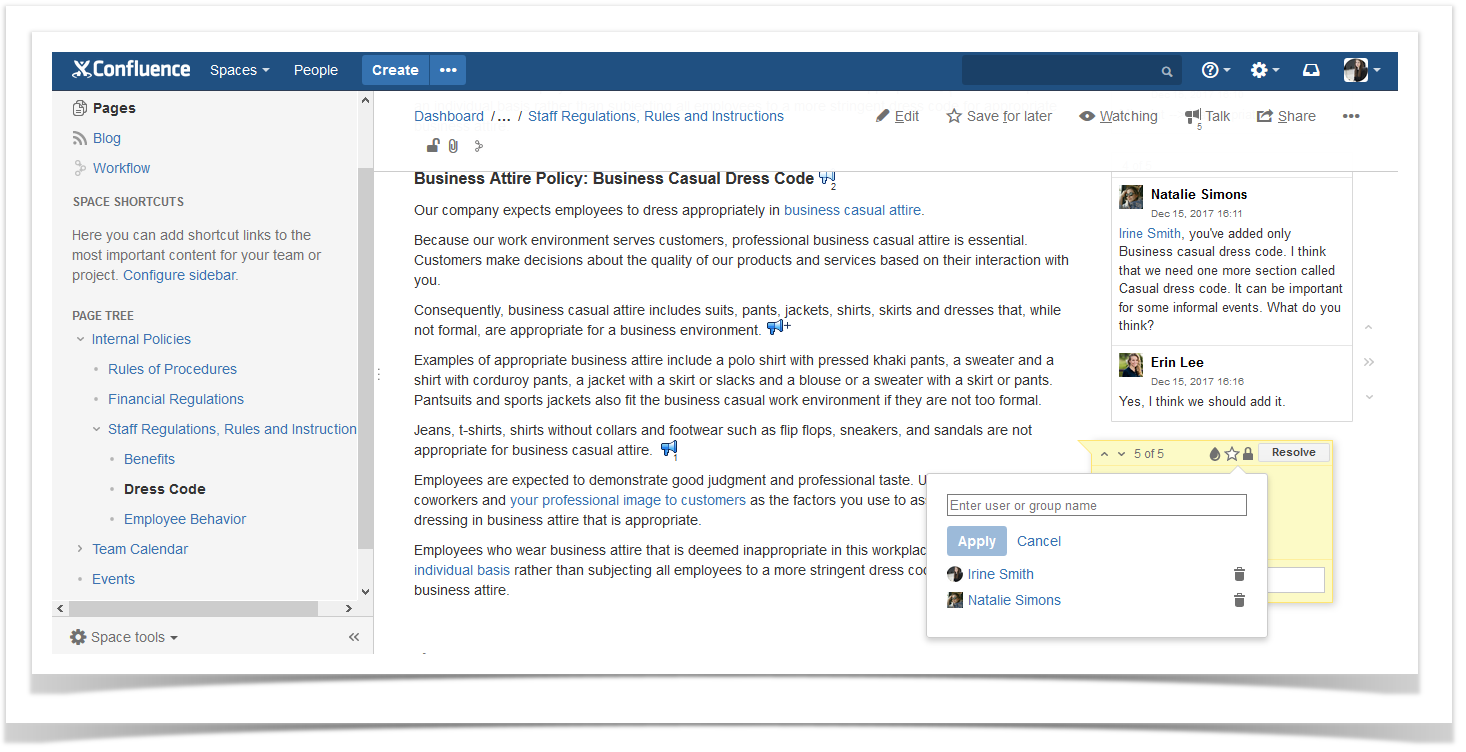
This app also allows users to restrict access to specific talks for appropriate users or groups.

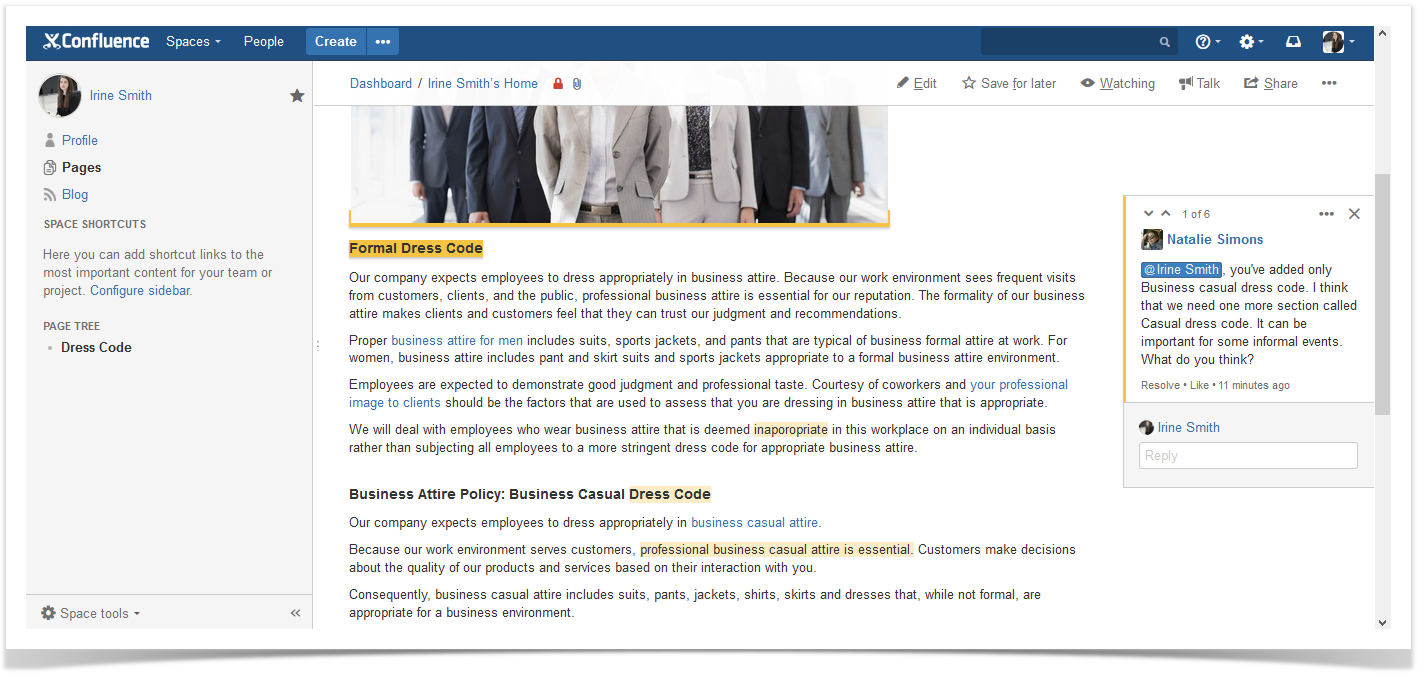
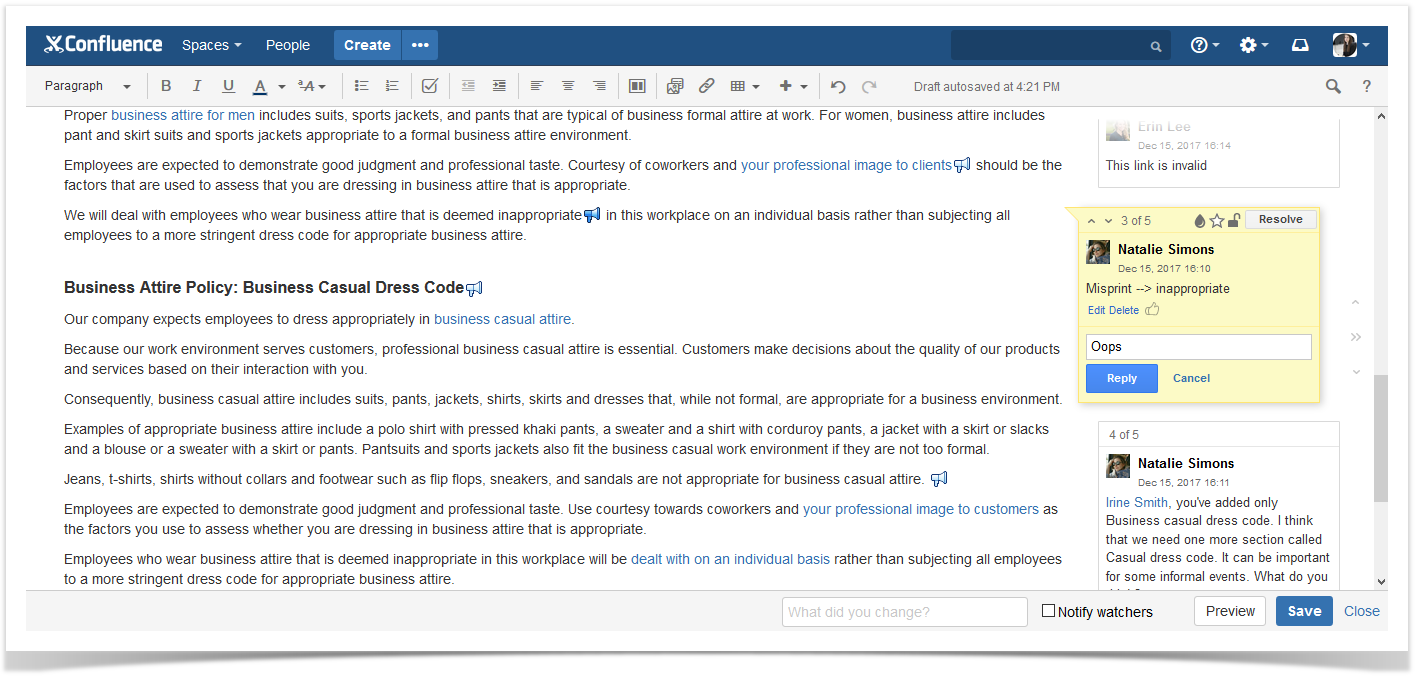
With Talk, the editors can add comments anywhere on the page, both while editing (not available in native inline comments) and viewing the page content. They can also add and resolve comments in both modes.

They can view all available comments at the same time.

Now the HR team can review three new pages simultaneously, discuss the content in real time, and collaborate more effectively.

Choose the Better Way

Using Comala Workflows and Talk is a great solution for collaboration between different departments of your company when one department actively works on the content of the document and other departments see the approved versions of your content. It saves time and helps you avoid mistakes when you work on public content together with your team.

Comalatech and StiltSoft offer a trial period for all their products. If you want to facilitate interaction between the editors of your internal documentation, you are more than welcome to try the combination of Comala Workflows and Talk – Advanced Inline Comments for free.

Check back soon as we will tell you how Comala Checklists and StiltSoft Table Filter and Charts help software companies organize data better. To stay tuned, subscribe for email notifications about new posts in our blog (enter your email in the ‘Newsletter’ section on the sidebar).

If you have any questions, feel free to comment on this blog post.

5 Add-ons to Advance in Confluence – Second Quarter 2017

July 20, 2017
#Confluence#News
2 min

2017 has passed its equator and it’s already summer time. And as usual we stick to our tradition to collect the five new tools on the Atlassian Marketplace. We have reviewed more than 50 add-ons appeared on the Marketplace between April 1 and June 30 and selected the five solutions that you may try.

If you have reached our blog for the first time, we want to remind you that this is a regular series of blog posts. To find out the list of add-on featured in the past quarter, see our 5 Add-ons to Boost Your Confluence in Q1 2017.

The current listing for the second quarter includes the following solutions:

It’s high time to see what benefits each of these solutions can deliver to you.

Continue reading “5 Add-ons to Advance in Confluence – Second Quarter 2017”

Related posts

    Case Study: How M20 Technology uses Confluence for customer and partner relationship management (CRM & PRM)

    August 3, 2016
    #Confluence#Case Study
    12 min

    About M20 Technology

    M20 Technology, an Atlassian Expert Partner in New York City, helps companies work and collaborate more effectively through the use of Atlassian tools.

    Atlassian Confluence is the knowledge base and team collaboration tool of choice for M20 Technology. Over the years they’ve gathered a great load of Confluence best practices for various cases. One of them is managing customer and partner relationships in Confluence.

    How M20 built a CRM and PRM in Confluence

    As a fast-growing business, M20 recognized the need for customer and partner relationship management (CRM & PRM). They needed an overview of their customers, prospects and partners to help build strong and sustainable relationships with them. For most organizations, such visibility is essential for continued success and growth of a business.

    As a business that specializes in building solutions in Confluence, the natural solution was to build it there and here is what it looks like today:

    This post covers a simplified solution of what M20 Technology uses today. This version makes it  easier to get started and create a basic framework you can customize and build upon. If you are interested in learning how to build a more comprehensive solution, check out this webinar hosted by ServiceRocket and M20 Technology.

    To set up such a system in Confluence, M20 Technology extended their wiki with 4 add-ons:

    • Google Apps Connector by M20 Technology – to connect Confluence with a company’s Google Apps account to retrieve contacts details
    • Reporting and Scaffolding by ServiceRocket – for building a table with contacts of customers and partners on a Confluence page
    • Table Filter and Charts for Confluence by StiltSoft – to dynamically filter the contacts table, e.g. search for a specific contact, find all contacts of a certain type (customer, prospect, or partner) or within a given location, hide columns irrelevant for a current session

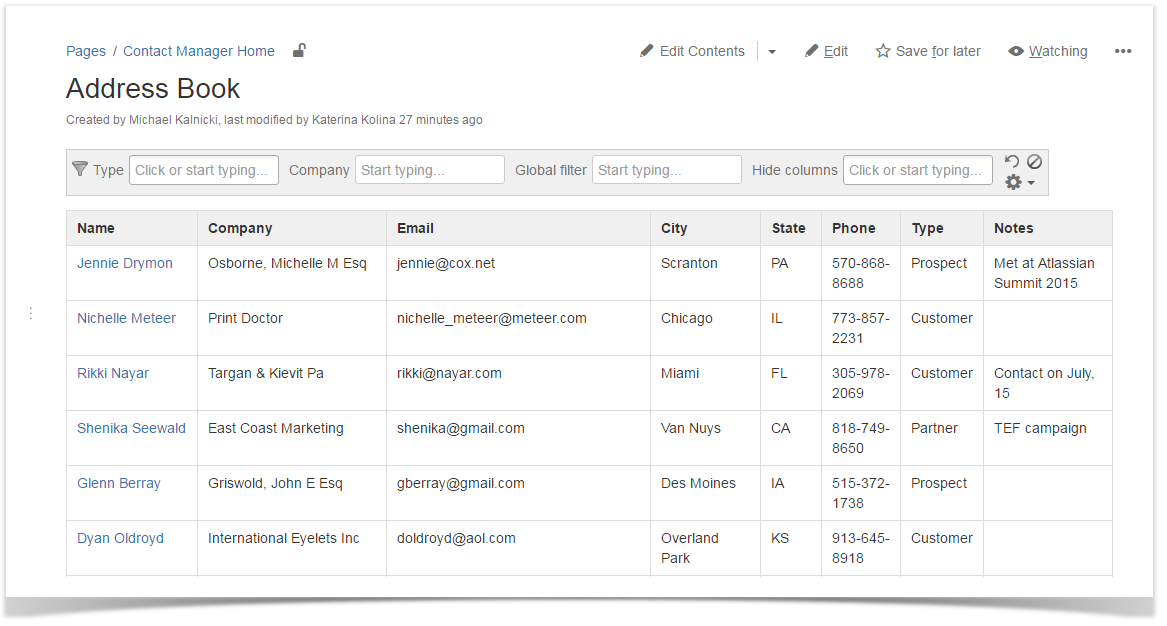
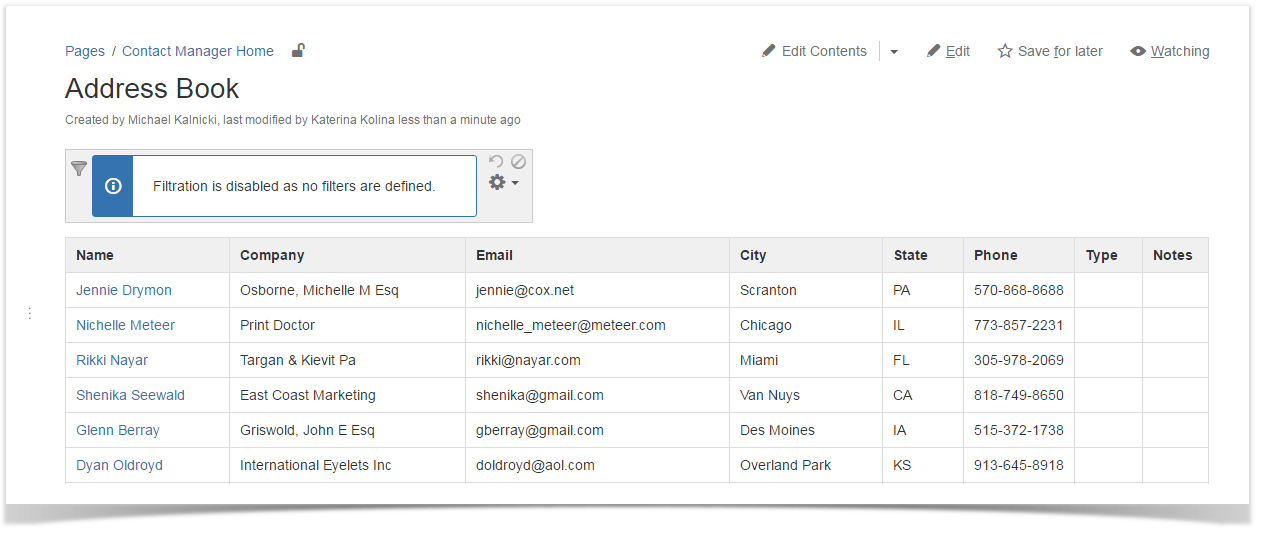
    It allowed them to create a table with contacts similar to the one below:

    This example contacts table includes:

    • 6 columns that are automatically populated with data from a linked Google Apps account: Name, Company, Email, City, State, Phone
    • the Type column, which has a predefined list of options a maintainer of a contacts table needs to manually choose from (customer, prospect, partner)
    • the Notes column, where you can enter any additional contact related information

    It’s up to you to decide what columns to use in your own contacts table. You can tune it as you wish by adding new columns (e.g. contact status, job title, LinkedIn profile, lead source) and deleting those you don’t need.

    Setting up a contacts table

    Let’s see how to configure this contacts table.

    To get started:

    1. Install the Google Apps ConnectorReportingScaffolding, and Table Filter and Charts for Confluence add-ons.

    2. Set up a Google Service account and authorize it in Confluence. Configure Google Apps Connector (see the Administrator Guide for details). If you don’t have a Google Apps account, you can skip this step and proceed by creating a dynamic table. Though you’d need to fill out your table manually adding one row at a time.

    Then create a Confluence page for your contacts table and set up a structure of macros on it as described below. It requires some work, but it’s initial configuration that needs to be done only once.

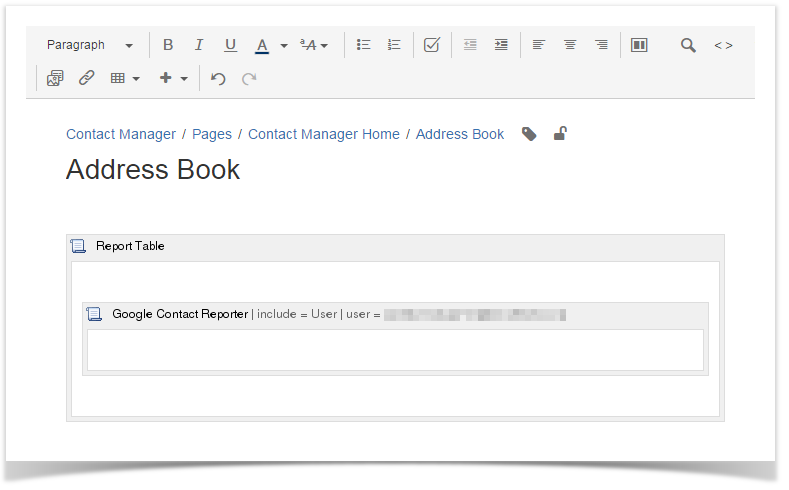
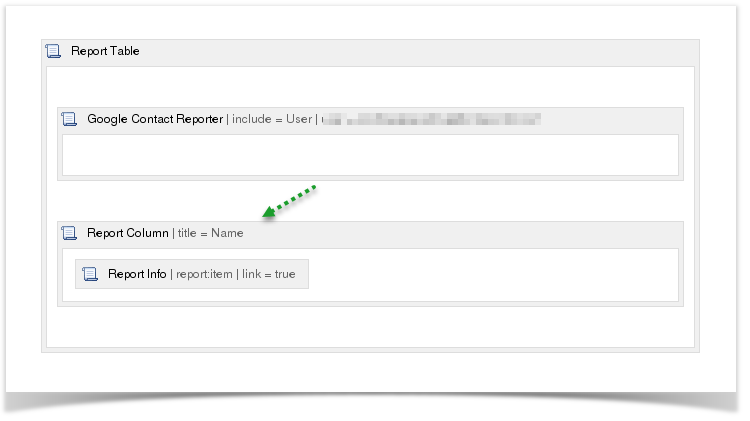
    While editing a page, insert a Report Table macro. Inside its body, add a Google Contact Reporter macro. In reporter, specify whether to list contacts from all Google Apps accounts linked to Confluence or only from some of them.

    Below the Google Contact Reporter macro, you need to add 8 ‘Report Column’ macros:

    1. Title the first Report Column Name. Embed a ‘Report Info’ in it. Set the ‘Report Info’ key to ‘report:item’ and check the ‘Link To Item’ box. It will display the contact’s name and link to the contact’s profile page.


    2. The title for the second one is Company. Check the ‘Injected’ box for it. Insert a ‘Report Info’ inside its macro body with the key ‘contact:company’.

    3. Next four Report Columns are also injected ones. Meaning you need to check the ‘Injected’ box for them. But they don’t require ‘Report Info’ macros. Insert the following keys in their macro bodies instead:

    • %contact:email% for the Email Report Column (to output the contact’s email address)
    • %contact:work address > address:city%  for the City Report Column (to extract the city property of the contact’s work address)
    • %contact:work address > address:state% for the State Report Column (to display the state of the contact’s work address)
    • %contact:phone% for the Phone Report Column (to render the contact’s phone number)

    4. The remaining Report Columns are Type and Notes. Both of them are also injected:

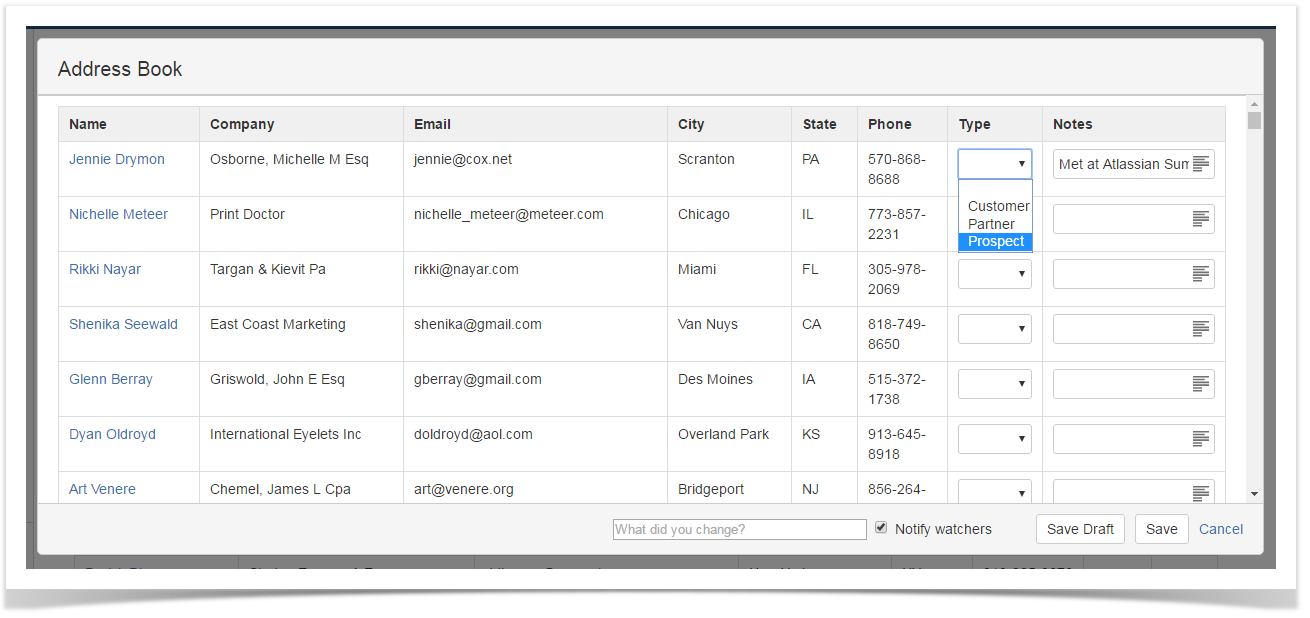
    • Inside the Type Report Column insert a ‘List Data’ macro. Specify a field name for it and choose ‘Select’ as a type option. Then embed 3 ‘List Option’ macros in your ‘List Data’ with values ‘Customer’, ‘Prospect’ and ‘Partner’. This combination of macros will create a drop-down list with contact type options for you to select from
    • And the last Report Column is Notes. Add a ‘Text Data’ macro in its body. Provide a unique field name and select ‘line’ as the type of field. It will display a text field in each contact record for you to type in your notes when working with a report.

    Now the configuration of your contacts table is done. It’s time to add filtration to your report. To do that, insert a Table Filter macro on the very top of your page and move the ‘Report Table’ macro with all those macros embedded in it inside Table Filter.

    You can set up your filters right here while editing a page or later when viewing your table. Let’s first save the page, see our contacts, and then get back to filtration.

    Ta-dah. We’ve got a table with all our Google Apps account contact details right in Confluence.

    Initially Type and Notes columns are empty. To work with them, click the ‘Edit Contents’ button on the page. You’ll have your table displayed in a window, where you can select a contact type in a drop-down menu and enter text in the ‘Notes’ field.

    Filtering and finding contacts

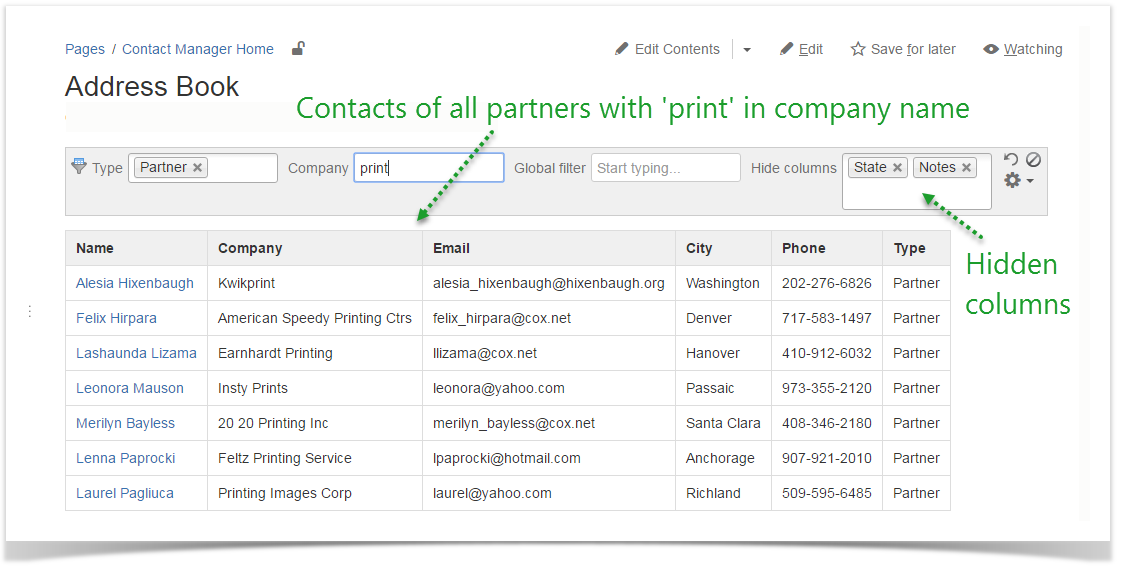
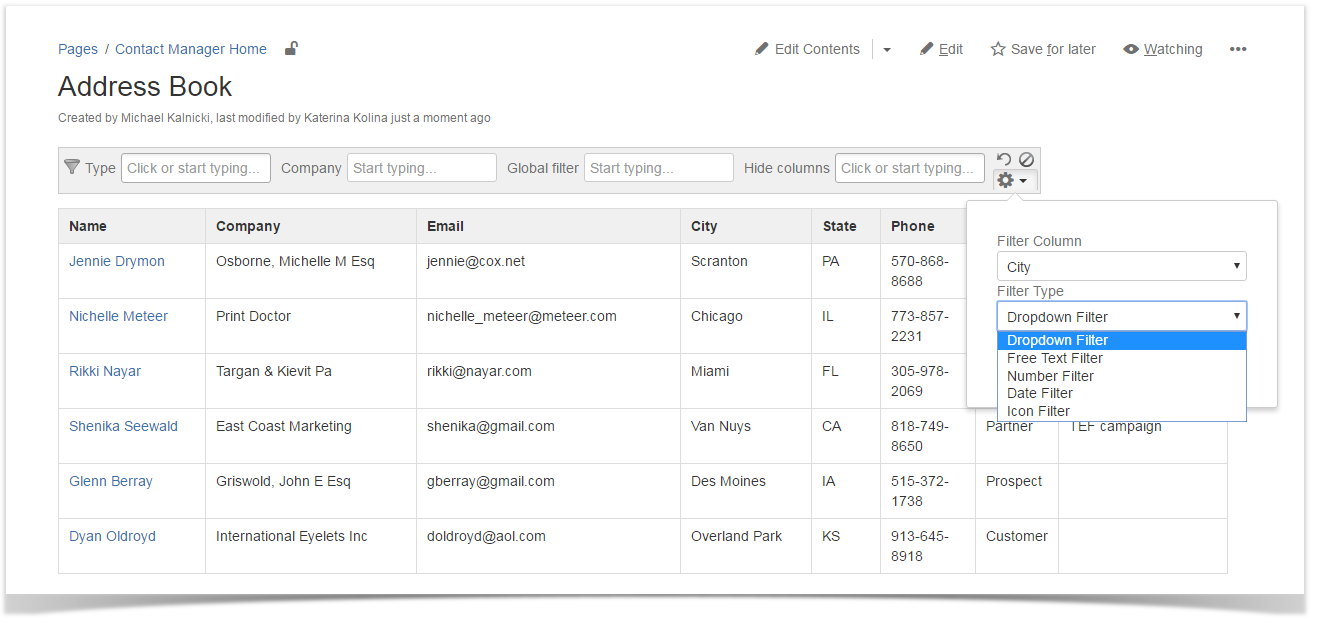
    Your contact database is ready for you to work with. There is a variety of filters that will help you search, filter and analyze your massive contacts report. In this example we’ll use 4 of them:

    • Global filter to search in all columns of a table
    • ‘Company’ free text filter for search by Company name
    • ‘Type’ drop-down filter to filter by contact type, e.g. to see only prospects
    • Hide columns filter to select what columns are not important for your current goals and should be hidden

    You can add filters and make changes in your filtration panel right in the View mode.

    And have your report dynamically updated when you apply filters.

    Moreover, you can create pivot tables and illustrative charts to get a summary of your contact table and analyze your contact list.
    It’s incredibly convenient to manage your contacts in the platform where your collaboration happens. Hoping this detailed step-by-step guide makes it easy for you to set up CRM and PRM in your Confluence. And another amazing thing is that there are so many other ways your teams can benefit from add-ons used in this solution. So go ahead and try it!
    Start your free trial of add-ons for Confluence used in this solution today:

    Top 5 New Add-ons for Atlassian Confluence – First Quarter 2016

    May 5, 2016
    #News#Confluence
    2 min

    The second month of spring has come, so it’s high time to see the Top 5 of Confluence Add-ons appeared in the Atlassian Marketplace in the 1st quarter of 2016. We have reviewed more than a dozen of Confluence add-ons published in the Marketplace between January 1 and March 31, and selected five add-ons  that may be useful and interesting to you.

    This is a regular series of blog posts about new add-ons, so if you have not read the already published posts, so feel free to find Top 5 Confluence add-ons in the firstsecondthird and fourth quarters of 2015.

    So, the actual list includes the following add-ons:

    Let’s try these solutions and use their capabilities in real life.

    Continue reading “Top 5 New Add-ons for Atlassian Confluence – First Quarter 2016”

    Related posts

      Top 5 New Add-ons for Atlassian JIRA – First Quarter 2016

      April 26, 2016
      #Jira
      3 min

      This year we continue our regular series of posts featuring Top 5 add-ons for the most popular Atlassian products. And our new series starts from the 5-add-on pack for JIRA Server and JIRA Cloud. All these add-ons were released in the first quarter of 2016. You can also read our previous blog posts highlighting Top 5 add-ons in the firstsecondthird and fourth quarters of 2015.

      Top 5 new add-ons for JIRA Server and Cloud includes only add-ons that appeared in the Atlassian Marketplace from January to March 2016. So, ladies and gentlemen, meet them:

      Continue reading “Top 5 New Add-ons for Atlassian JIRA – First Quarter 2016”

      Related posts

        Increase Employee Engagement with the 3 C’s of Internal Communication

        April 13, 2016
        #Confluence
        1 min

        This is a guest blog post from Nicholas Muldoon, creator of Better Blogs for Confluence and an Atlassian and Twitter alumnus who is passionate about improving organisational effectiveness.

        Effective communication is vital to keep employees engaged and motivated. Research shows there is an “explicit positive relationship between communication satisfaction and employees’ organizational commitment”.

        Authentic, frequent and collaborative conversations with employees leads to increased trust, decreased turnover and improved productivity. In this post we’ll explore how candor, cadence and collaboration can drive increased employee engagement and improve organisational performance. These are the ‘three Cs’ of effective internal communication.

        Continue reading “Increase Employee Engagement with the 3 C’s of Internal Communication”

        Related posts