Posting GIF Screencasts to Atlassian Confluence and JIRA

July 28, 2015
#How To#Confluence
9 min

All of us, amateurs of Confluence and JIRA, post a lot of information to Atlassian ecosystem. In most cases, Confluence is used to store documentation with instructions, and JIRA for keeping bugs and issue reports. While working with documentation or issues, sometimes you realize that posting a video file is much more convenient than describe all instructions or issue reproduction steps. But if you has not uploaded your video to YouTube, you will encounter some difficulties with storing this video file in your JIRA or Confluence. So is there any solution that can simplify this experience? Yes, there is – animated screencasts in GIF.

They are good to capture attention of your readers with some animated images and save some time page space on images and text description. Animated files and screencasts are also ideal to show dynamics and changes that occur on the screen. So screencasts will be perfect to present some instructions or how-to-do steps on the pages of your web blog. In the current blog post we will review tools and applications that can facilitate your experience with screencasts and speed up your work on their production.

GIF animations allow you to captivate your readers and viewers with the visually appealing content that they are also easy to percept and understand. In the real life you can create a series of screencasts to show how this or that option works, for example, as we did for Table Filter add-on. Here we combined the instructions with the output result. This helps our customers to better understand how the add-on options work and affect the overall customer experience with data tables.

Our company works much with Atlassian Confluence and JIRA, so GIF files help us to embed the screencasts with the feature overview in documentation or issue reproduction steps to the issue tracking system. This saves a lot of time as we do not write long instructions or issue explanations, so employee have more time for other activities.

Advantages of GIF Files

Usage of GIF animation files can bring several benefits to you and your content. They are usually short and highly compressed, so do not require so much traffic as videos. They are quickly loaded in the browser and can work on different devices with different operating systems, so almost all your visitors and readers will be able to get your information at once if comparing against videos or Flash files.

Pivot table aggregation

Short animated clips are an excellent way to point someone’s attention to the required piece of information. It is not accidentally that online ads are usually GIF files for capturing viewers’ attention and promoting some idea.

The only limitations of GIF files are the insufficient range of available colors and lower recording quality in comparison to video files.

Online GIF Animation Tools

If you do not have an opportunity to install some GIF animation application but you have access to the Internet, you can try online tools. Such services as as GIFMaker.meEZGIFPicasionGICKR or imgflip allow you to upload a series of images that are further converted into a GIF animation file. You can configure dimensions of your output file, set the appropriate animation speed or playback pattern and perform additional manipulations on the file and its assets.

Image uploading

Other services allow you to convert the already available video files to GIF format. For example, makeagifgifyt or Imgur allow you to convert the manually uploaded videos or videos from YouTube to GIF files. Such services usually impose limits on duration of your GIF files, so avoid long cinematographic intros (smile).

Mageagif screenshot

If you do not have some source files, such as a series of images or a video file, you can try to record your screen and save as a GIF file. You can try Screenr for doing this.

Making a screenshot

Simple Offline Animation Tools

As an alternative to online tools, you can try offline applications that can record screencasts and save them to GIF files or automatically publish to the Internet.

Here you have a variety of tools and applications that can help you to capture the defined area of your screen and instaly output it to a GIF animation file. The simple and free tools do not have many options, so in most cases you will be able to define the frame rate and dimensions of the outputted file, and that’s all (smile).

Pivot table in Confluence

For example, you can start with ScreenpressoLICEcapRecorditScreenToGIF or Gyazo. These applications are quite simple and will not take much time before you get the desired result.

Confluence chart

Advanced Offline Animation Tools

As one of the most powerful tools to work with your GIF animations is Camtasia Studio. This is a universal multimedia tool that can help you with almost all procedures starting from screencast recording, further cross-cutting and production, and final output to the appropriate file format.

Besides editing the timeline of your screencast, you can clip or extend duration of the screencast, add callouts and optional text. With this tool you can achieve great results and your screencasts will be always memorable and highly impressive.

Camtasia gif recording

And remember that It is better one time to see things than one hundred times to hear about them. So if you use images it is cool, but why not to add some animations…

Integration of Yellowfin and Confluence

April 21, 2015
#How To#Confluence
13 min

The modern world abounds with enormous amounts of data that remain just characters and digits without a tool that can aggregate, process and visualize this data for better perception of information. Yellowfin is an analytic software solution that allows you to maximize efficiency of your business intelligence with numerous reports and dashboards. It supports multiple data sources, such as relational databases, multi-dimensional cubes or in-memory analytical databases.

In this blog post we will review integration between Yellowfin reporting platform and Atlassian Confluence for quicker team collaboration.

Standard Integration Capabilities

Yellowfin is equipped with JavaScript API, which allows you to embed JavaScript code snippets onto your web pages. You can embed either reports or dashboards onto your pages with the JS code snippets automatically generated in Yellowfin.

Yellowfin and Confluence

A generic code snippet will look like the following one:

//JS code to embed the report
<script type="text/javascript" src="http://yellowfin_server/JsAPI?reportUUID=370cf271-0b78-4e55-ba81-cf4a71e29acf&width=829&height=295"></script>

//JS code to embed the dashboard
<script type="text/javascript" src="http://yellowfin_server/JsAPI?dashUUID=9a31442d-d8a6-4aad-ad11-d342db606b64&width=800&height=400"></script>

The basic script includes address of the Yellowfin server, path to JavaScript API and the size of the reporting area in pixels. As usual, you will have to include the login and password in the JS code if you want to embed it into some external resource.

//JS code to embed the report
<script type="text/javascript" src="http://yellowfin_server/JsAPI?reportUUID=370cf271-0b78-4e55-ba81-cf4a71e29acf&width=829&height=295&username=admin@yellowfin.com.au&password=test"></script>

So what can you do with this JavaScript code in Confluence? You can create a new page and add HTML macro, which you can further paste your report or dashboard code into.

Yellowfin and Confluence

Once you save the page, you will be required to enter the credentials once again and then the report will be generated.

Yellowfin and Confluence

You can embed multiple reports per Confluence page and get data visualized in one place.

This way of embedding Yellowfin data is not very convenient as it exposes your credentials and all the time you need to verify JavaScript code as you can make any mistake in it.

Inserting Yellowfin Reports via User Macro

A better way to embed Yellowfin reports and dashboards into your Confluence pages is to write a user macro with the interface for entering parameters.

Navigate to Administration console > Configuration and select User macros. Once the page opens, click Create a user macro.

On the opened page, specify the basic information about the user macro. You need to enter the user macro name which will be used for inserting the macro on the page, define its visibility and select the category, which the your user macro will be associated with.

Yellowfin and Confluence

For the Macro Body Processing, select ‘Rendered’ so Confluence will render the content received from Yellowfin API.

Yellowfin and Confluence

As the macro template enter the following code:

## @param elementId:title=Element ID|type=string|required=true|desc=Enter the Element iD
## @param reportUUID:title=UUID|type=string|required=false|desc=Enter the report UUID
## @param showFilters:title=Show Filters|type=boolean|required=false|desc=Enable the information showing
## @param showExport:title=Show Export|type=boolean|required=false|desc=Enable display of page links
## @param height:title=Height|type=int|required=false|desc=Enter height of the report
## @param width:title=Width|type=int|required=false|desc=Enter height of the report
 
<ac:structured-macro ac:name="html">
    <ac:parameter ac:name="atlassian-macro-output-type">INLINE</ac:parameter>
    <ac:plain-text-body><![CDATA[<div id="$paramelementId">

//Both Confluence and Yellowfin are installed on the local computer. If instances are installed on different servers enter the appropriate address of Yellowfin server.
<script src="http://127.0.0.1:8087/JsAPI" type="text/javascript"></script>
<script type="text/javascript">
	var options = {};
		options.elementId = '$paramelementId';
		options.reportUUID = '$paramreportUUID';
		options.username = 'youremail@example.com';
		options.password = 'yourpassword';
		options.showFilters = '$paramshowFilters';
		options.showExport = '$paramshowExport';
		options.width = '$paramwidth';
		optionsheight = '$paramheight';
	yellowfin.loadReport(options);
</script>

</div> </ac:plain-text-body>

So let’s divide this code into snippets and see what each piece of it does.

This code snippet defines the set of input elements available in the macro browser. For each input element you need to define its name, title in the macro browser, type, required or not, and text description of the input element. You can find detailed information about parameters in user macros in Confluence documentation.

## @param elementId:title=Element ID|type=string|required=true|desc=Enter the Element iD
## @param reportUUID:title=UUID|type=string|required=false|desc=Enter the report UUID
## @param showFilters:title=Show Filters|type=boolean|required=false|desc=Enable the information showing
## @param showExport:title=Show Export|type=boolean|required=false|desc=Enable display of page links
## @param height:title=Height|type=int|required=false|desc=Enter height of the report
## @param width:title=Width|type=int|required=false|desc=Enter height of the report

The screenshot below illustrates these input elements in the macro browser.

Yellowfin and Confluence
The next code snippets is our macro body that inserts the HTML macro that will be used for output of reports and dashboards from Yellowfin server.

//Inserts the HTML macro that will be used to wrap our Yellowfin script.
<ac:structured-macro ac:name="html">
    <ac:parameter ac:name="atlassian-macro-output-type">INLINE</ac:parameter>
    <ac:plain-text-body><![CDATA[<div id="$paramelementId">

//Calls Yellowfin script that will fetch the report or dashboard from Yellowfin server.
<script type="text/javascript">
	YELLOWFIN SCRIPT GOES HERE
</script>

</div> </ac:plain-text-body>

We want to point your attention to the specific HTML element that will be used for output of Yellowfin report/dashboard stored in the tag shown below. Our user macro will allow you to enter its ID right in the macro browser, so you will be able to insert multiple reports and dashboards on the same page without any issues. The $paramelementId parameter will take the value entered as Element ID and paste it into our user macro.

<ac:plain-text-body><![CDATA[<div id="$paramelementId">
</div> </ac:plain-text-body>

And the last part of out user macro is the call of Yellowfin script that will make a request to its JavaScript API on the server and fetch the required report with the defined parameters. As you can see $param+parameterName is used to fetch the value defined in the macro browser and insert it into the script. In Yellowfin documentation you can find the fullt list of parameters for reports and dashboards. The example below provides a range of basic parameters required for output of the report, the similar code can be used for dashboards. You can alternate the parameters or remove the unnecessary ones if needed. Some parameters are mutually exclusive so please consult Yellowfin API documentation before you start.

<script src="http://127.0.0.1:8087/JsAPI" type="text/javascript"></script>
<script type="text/javascript">
	var options = {};
		options.elementId = '$paramelementId';
		options.reportUUID = '$paramreportUUID';
		options.username = 'youremail@example.com';
		options.password = 'yourpassword';
		options.showFilters = '$paramshowFilters';
		options.showExport = '$paramshowExport';
		options.width = '$paramwidth';
		optionsheight = '$paramheight';
	yellowfin.loadReport(options);
</script>

Once you complete save the user macro.

Inserting User Macro

Open the necessary Confluence page and switch it to the edit mode.

Start entering {Ylbrep} and select your user macro. Name of your user macro may vary if you set a different one.

Yellowfin and Confluence

Then just enter the required Element ID and insert report UUID from Yellowfin server and that’s it. If needed, enable display of filters and report export, and specify the required width and height of the report.

Once you save the macro, its parameters will be saved in its body.

When you save the page the report will appear on it and you can work with it as in Yellowfin itself. The report will be updated upon each reload of Confluence page, so if new data is continuously supplied to Yellowfin you will get all the time the updated data.

Yellowfin and Confluence

As you can see it is not a problem to quickly and easily integrate Yellowfin and Confluence. Yellowfin Javascript API is easy to understand, use and customize. Besides the generic embedding of the report or dashboard, you can insert them with the already filtered results and save a bit of your time.

Top 5 Most Requested Features for Confluence

March 12, 2015
#Confluence
21 min

The modern IT world cannot imagine its existence without a collaboration and interaction platform. Confluence has become known as one of the most reliable and featured wiki-systems with a plenty of out-of-the-box capabilities and options. Its popularity is continuously growing, but and users’ requirements to Confluence are also increasing.

Atlassian is open to interaction with end users and provides the open JIRA stand where everyone can report an issue or request a new feature that is missing in their products. Some features are added, the others are postponed or rejected. Anyway the declined and postponed features get their life in the form of custom enhancements that you can download as add-ons for Atlassian products in the Marketplace.

Some time ago company Adaptavist made an attempt to create the list of Top 5 Requested Features for Confluence written in 2011. It included the following features:

After all, only the third feature request change of usernames has been completed. The forth request has been rejected at all, but now most browsers support the spelling checkup so it is not a problem anymore. The rest of requests are still open and it is unknown when they will be completed.

We will retry their experiment and will present the updated Top 5 Most Requested Features for Confluence – Year 2015. The updated list look like this:

#5 – Numbered Headings

This feature has preserved its fifth position on the list. 368 votes, 198 watchers, more than 80 comments did not make Atlassian ready to start development of this feature.

The original feature request sounded like:

Would like the ability to display numbered, formatted headers. Same test style as existing headers (h1., h2., etc), but with dot-notation nested numbering.

Maybe something like: h#., h##., h###., etc.

So markup like:

h#. One
h##. One-one
h##. One-two
h#. Two
h##. Two-one
h###. Two-one-one

Nevertheless, this feature is available as an add-on for Confluence. Numbered Headings developed by Avisi B.V. is a free add-on that allows you insert your text with headings into a macro, which automatically adds the required numbering for each heading depending on its level.

You can select the appropriate numbering format from the available ones or create your custom format. Additionally you can enter the number to start with your numbered list and add heading levels that should be skipped by the add-on. Configuration is pretty simple and the interface is intuitive even for newbies in Confluence.

An alternative solution, is Engineering Essentials add-on from Precision Plugins. The add-on allows you to select the space where headings will be automatically converted to numbered headings. You have no other options as in the previous add-on, but you needn’t place your headings into the macro all the time. The add-on also shows numbered headings in the view mode, unlike Numbered Headings add-on showing numbers in both view and edit modes.

This add-on is paid, but it has an extra feature that makes addition of change comments as required when you save the page.

#4 – Complete Space Duplication

This feature request was added almost 10 years ago. 376 votes, 173 watchers, about 60 comments and this feature is still not complete. Frankly speaking it is complete, but still open for Confluence Cloud.

The original user’s request sounded like:

It’d be really very handy to be able to duplicate a space. Export/import only works on 1 space I think (it seems to have lots of integer ids in there so I dare not try exporting, twiddling things and reimporting).

What would be really nice would be a ‘copy space’ option where you can duplicate an entire space as a different name/key.

e.g. setting up projects at codehaus; it’d be good to use an existing space as a base, then copy the entire thing, then after that either export/import to search/replace, or just manually modify pages after that.

Your can use the native add-on from Atlassian Labs – Copy Space for Confluence Server 4.2 – 5.5.7. Unfortunately, it is no longer supported but you can try to manually install it on your Confluence version.

When you open the content tools for the definite space you can make a copy of your space including all comments, attachments and personal labels. If needed you can also keep the original authors and dates for the page copies. During duplication you need to enter a new space name and its space key.

After clicking the Save button you will get an exact copy of your space. The only problem is that it copies the latest revision of the page skipping all the other revisions, it also excludes blog posts and emails. The other major problem is space permissions. which are not considered during space duplication and all your restricted pages become open for all users.

An alternative solution for Confluence Cloud is Copy Space OnDemand from Artemis Software. It is similar to Atlassian’s add-on, but has some modifications.such as progress of the copying procedure and the log with of operation. It has the same limitations as Copy Space for hosted instances.

If you do not want to use any add-ons you can do use the native functionality of exporting Confluence spaces to XML. Here you will have to change the space name in the exported XML files and then you can restore this space in Confuence as a new space. The similar procedure can be performed with the Archiving Plugin.

#3 – Inheritance of page edit permissions from the parent page

Confluence has the built-in permissions for viewing and editing pages. The view restrictions are automatically applied to the child pages from the parent page. But this does not work for edit permissions when you have set edit restrictions for each page in particular. 421 votes, more than 250 watchers and around 90 comments from users waiting for this feature get done.

This feature is mostly needed for companies sharing their content and documentation with their customers. Without this feature you need to manually define the edit restrictions for each page of yours instead of automatic inheritance of restrictions from the parent page. Unfortunately, there is no add-on that can provide the similar capabilities for now.

The possible workaround for this issue is Run CLI Actions in Confluence add-on being developed by Bob Swift. You can use a custom command to automatically apply the edit restrictions to the page descendants.

#2 – Sectional Editing

This feature was added almost 9 years ago and it is still open. 438 votes, more than 220 watchers and about 130 comments from users waiting for the desired feature.

It is not a secret that Confluence pages can be long, can be very long, can be extremely long, and here’s the main reason for this feature request. When you deal with such pages and edit them, sooner or later you came to conclusion that you waste much time on scrolling pages up and down, up and down, again and again. The possible solution here is a capability to edit page sections divided by headings of different levels.

One of the most convenient and easiest-to-use solutions is InPlace Editor for Confluence developed by StiltSoft. It allows you to enable sectional editing for the appropriate headings levels and spaces.

An additional Pencil icon is shown next to the allowed heading levels, which when clicked will open a visual editor for adding, editing or updating text, inserting images and macros. InPlace Editor uses the similar editor as Confluence does, so you will not have to acquire new experience with some over-complicated editor.

Just work with page sections and do not scroll anymore.

#1 – Copying page hierarchy with attachments

And the last, so better the first, the most requested feature for Confluence is a capability to copy the page hierarchy including all the attachments.

About 750 votes, more than 320 watchers, 160 comments from users looking forward to getting this feature in Confluence. This feature is very useful when you deal with the similar information in different places of your Confluence. You can quickly copy the source data, updated it in some other place with new information and save a plenty of time for other activities.

The most convenient solution for you is to use Copy Page Tree add-on developed by Artemis Software It is available for both hosted and Cloud versions of Confluence. It is paid but its price is reasonable and you will not go bankrupt with it installed.

The add-on adds its own action into the Tools menu. When you activate the add-on, it allows you to select the new location for the page tree. Then you can select the pages that you want to copy to a new place. To avoid the problem with identical page names within the same space you can use page prefix and suffix or replace word or part of the title with the new text.

As an alternative, you can use the Atlassian’s native add-on – Confluence Copy Pages. It has fewer options than the latter add-on but it is free. Its main con that it does not allow you to choose which pages to copy as it allows you to select copy of one page or copy of the page with all its childs, so in the result you may get a lot of rubbish pages for removal.

Another solution is to use Run CLI Actions in Confluence add-on and use the command similar to the one displayed below.

confluence --action copyPage  --space "confluencecli"  --title "Home"  --newTitle "This is new title 1"  --newSpace "confluencecli2"  --parent "Home" --replace --descendents --copyAttachments --copyComments --copyLabels

So you have multiple ways to copy your page hierarchy to a new place, and which to choose depends on your preferences.

Conclusions

As you can understand, Atlassian uses their own approach for development of particular features. It provides a gap for Atlassian Experts and other development vendors to develop add-ons that provide options to fulfill the opened positions in the market. This stimulates development of Atlassian products and Marketplace with the more tools to improve your user experience.

Efficient Communication in Confluence

June 27, 2014
#Confluence#Collaboration
10 min

Communication has always been an essential part of the human life. The main result and objective of communication is exchange of information. Information is one of the main factors that stimulates human evolution and drives the mankind further. Information is one of the most precious things in our digital world, because when you have information you can conquer the entire world.

In this blog post, we will review the existing solutions that can help you to exchange messages with your colleagues in real time.

Today we will review handy tools for communication in Atlassian’s world of Confluence. Confluence has become a very popular platform for documentation management and quick communication and collaboration between different teams, for example, developers and technical writers. Confluence comes with a built-in system of comments that looks quite inefficient when you need real-time communication with your peers. You can use external communication applications, such as Skype, ICQ, P2P agents and so on. But all the time you need to switch between them and Confluence, which becomes rather distracting as a result.

You can also use the Atlassian’s native chat service – HipChat, which allows you to communicate with your teammates and colleagues in group chats and video chats.

Confluence Chat

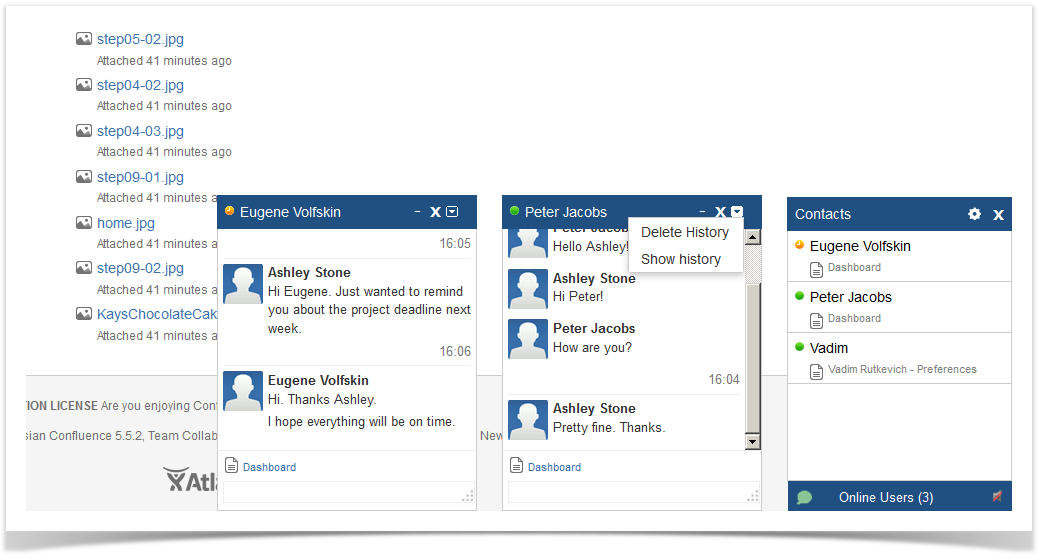
Confluence Chat is a comfy solution that allows you to easily communicate with Confluence users in the dedicated chat dashboards. The main dashboard displays users that are currently logged in and who you can chat with now. Once you start conversation with a user – a separate dashboard opens at the footer of the page. You can open several dashboards for simultaneous communication with each user at a time. Once a new message comes from your peer, you will hear the corresponding sound, which can be disabled.

The dashboard with the chat works both when you view pages and edit them, the latter option can be disabled if you want. You can always view the chat history in your profile. Chat history can be viewed for the past day, week, month and year, you can also view the entire history if required.

confluence chat status selection

You can define your status or collapse the dashboard if no longer needed. The add-on allows you to restrict usage of chat to the appropriate user groups and set space restrictions. If you do not work with Confluence for some time, your chat account is shown as ‘Away’.

confluence chat configuration

The add-on is free, but, unfortunately, it does not support group chart, so it is more suitable for private conversations rather than team collaboration. Interface of the add-on is intuitive so it will not take more than several minutes to get around it and start using. It is an ideal solution for quick chat within small teams.

 Pros

  • Free
  • Realtime chat
  • Intuitive Interface
  • Chat history
  • Sound notifications
  • Configuration options
  • Chat dashboard in view and edit modes

Cons

  • Impossibility to create a group chat
  • Impossibility to share files via chat

Wikistrat Private Messaging

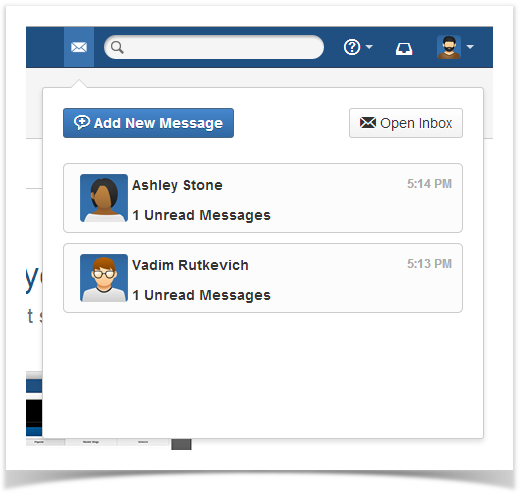
Wikistrat Private Messaging is an enhanced version of built-in message sharing system available in Confluence. It deploys some sort of message exchange system, which resembles the usual email technology. Each user gets a box for incoming messages with indication of the recently received messages.

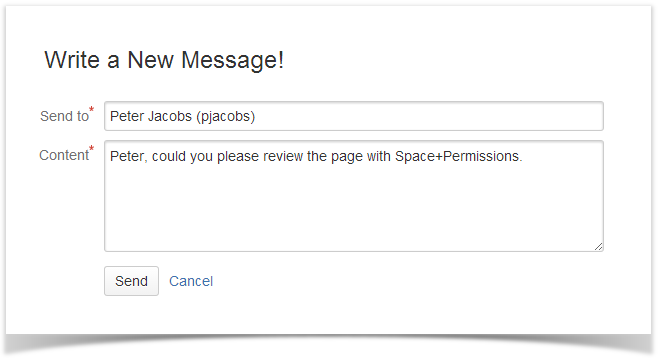
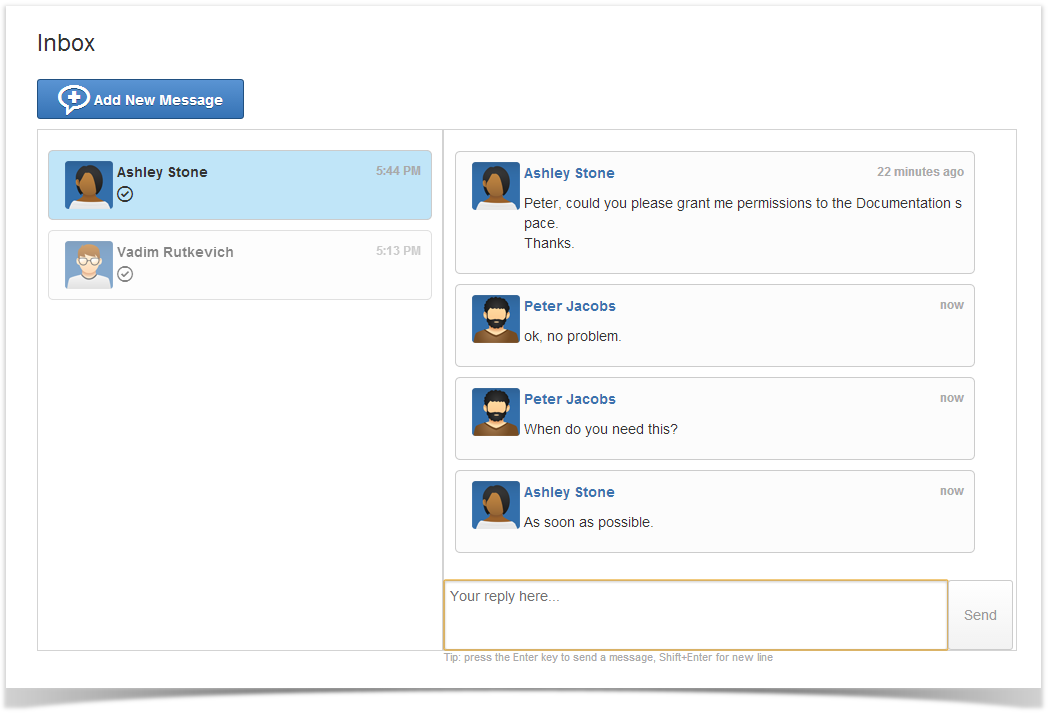
The user can quickly send messages to the appropriate user by clicking the icon on the toolbar. Once you receive a message from your peer, you get a notification on the toolbar. You can quickly open it and send a response. The add-on also allows you to view the entire list of peers who you already talked to. So then you can select the person you want to communicate with and send some message to him or her.

You can also view the overall chat history with the selected user or start a new converstion with other users.

 Pros

  • Intuitive Interface
  • Realtime chat and individual messages
  • Chat history
  • Visual notifications

Cons

  • Impossibility to create a group chat
  • Impossibility to share files via chat
  • Paid add-on

Talk – Inline Comments for Confluence

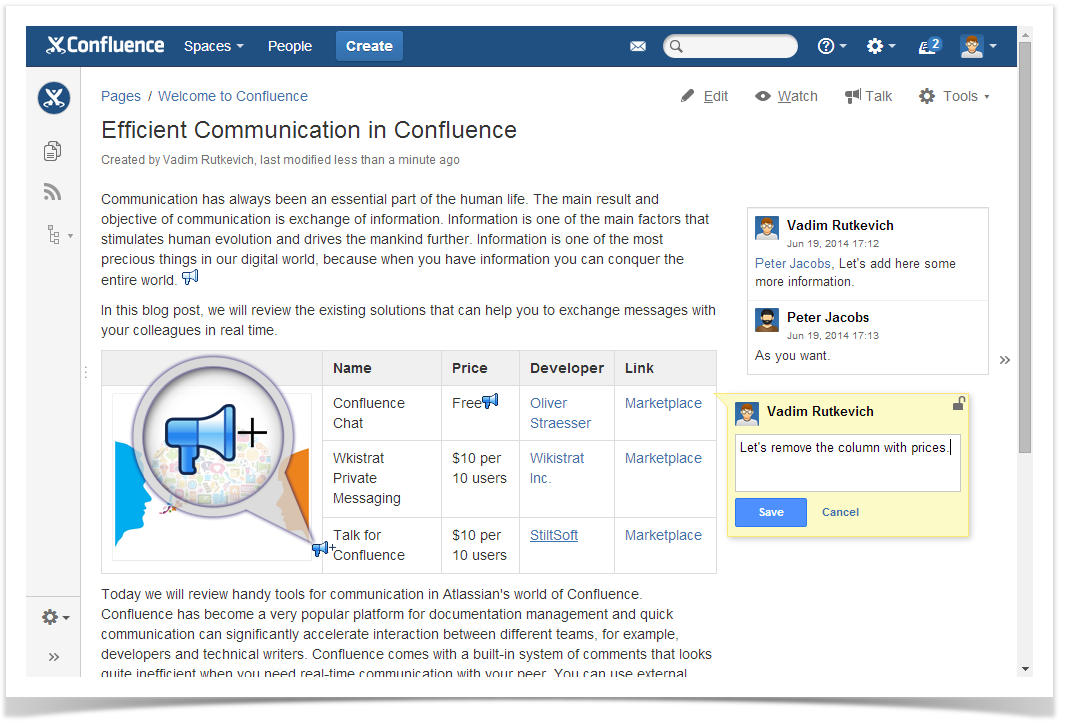
Talk – Inline Comments for Confluence is not a chat engine in its essence, it is like a powerful commenting tool for quick team collaboration. Instead of realtime communication, it provides you with another way of interaction with your teammates. Talk gives you freedom to comment any text snippet on your Confluence pages and then discuss it with your teammates.

So it is an ideal solution for editors and technical writers and also for other people who work actively with documentation. The add-on allows you to put special placeholders while editing or viewing page contents, and then you can quickly add comments or requests, mention users, use wiki markup for styling and highlighting.

talk inline comments talk replying

You can add talks while viewing or editing your pages, the talk appears on the page and your colleagues can instanty post replies or add comments.

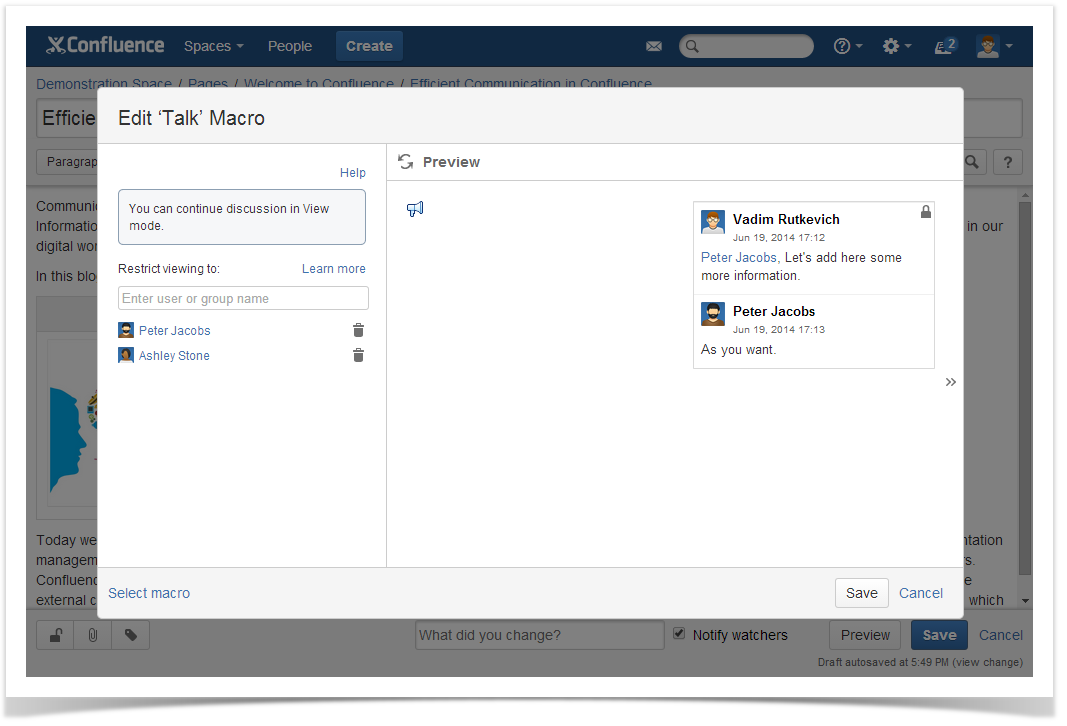
The add-on also allows you to restrict access to some talks for the appropriate colleagues of yours. So you can discuss some things on the page with the narrow group of people or even add personal notes or remarks for yourself. Even the space administrator will not be able to view such talks.

talk inline comments settings

You can always disable insertion of talks in the view mode by pressing the hotkey or selecting the corresponding option. You can also collapse the sidebar with talks when you need more room on the page. In the upcoming release the add-on will receive functionality of real-time talk update, so you wll get immediate talk updates when viewing Confluence pages. You can vote for this feature in our Feedback system.

Pros

  • Excellent inline comment tool
  • Intuitive Interface
  • Talk history
  • Adding talks in view and edit modes
  • Workbox and email notifications
  • Viewing restrictions
  • Wiki markup support and user mentions

Cons

  • Non-realtime communication tool
  • Impossibility to attach files
  • Paid add-on

Atlassian Confluence Look & Feel Tricks: Adding Info to the Page Header and Footer

March 25, 2014
#How To#Confluence
5 min
Edit long Confluence pages by parts with InPlace Editor.  Check the demo and try for free.

If you ever wondered how to share some important info with all Confluence users, here’s the answer – try using headers and footers. You can rest assured that a message added to the header will be read by everyone who opens Confluence. And keeping stuff like useful links in the footer is more productive than searching for it in Confluence or in bookmarks.

Follow the steps below to try this out. Please, note that we assume that you’re using the standard theme on Confluence 5.4. Other themes have their own ways of customizing headers and footers. And the code we provide here can be slightly different for other Confluence versions.

Ok, let’s say we want to make some global warning for everyone working with Confluence. To do that, we need to go to Confluence Admin – Look&Feel – Custom HTML and add something like this to the At beginning of the BODY section:

<div>
    <p>
        <span></span>
        <strong>Hey guys!</strong>
    </p>
    <p>Confluence is going to be down from 4pm.</p>
</div>

Save the changes and see how it looks like in Confluence:

Header

If you want to make the message look different from this example, you can choose various message styles in Atlassian AUI.

Being a less prominent part of a pafe than the header, the footer can, however, contain important info you want always be at hand, for example, a privacy policy or help links. Although Atlassian provides some recommendations on changing footers, they involve editing Confluence files and system restarting.

We’d suggest an easier way to change the footer. Again, in Confluence Admin – Look&Feel – Custom HTML, add the code for the Privacy Policy and Support links (lines 4 and 5) to the At end of the BODY section:

<script type="text/javascript">
AJS.toInit(function ($) {
    AJS.$("div#footer .footer-body").prepend("<ul id='footer-custom-links'/>");
    AJS.$("ul#footer-custom-links").append("<li class='noprint'><a href='https://stiltsoft.com'>Privacy Policy</a></li>",
                                           "<li class='noprint'><a href='https://stiltsoft.desk.com/customer/portal/emails/new'>Support</a></li>");
});
</script>

And your footer will look like this:

footer

Please, note that according to the Atlassian EULA you can’t remove the Powered by Atlassian Confluence line from the footer. So be careful about this when experimenting.

For other our posts about Confluence customization, see here. Follow us on Twitter and Facebook to stay tuned for future hints and tricks.

Three Ways to Deal With Long Pages in Atlassian Confluence

March 18, 2014
#Confluence
6 min

Making changes to Confluence pages is a pretty straightforward task thanks to a user-friendly Atlassian Confluence editor. However, as implied by this highly voted feature request, many people find it annoying to edit really long pages.

As pages get more complex, scrolling back and forth and hunting for the part you want to edit can be pretty tiresome. Moreover, if someone else is editing the same page simultaneously with you, you’ll have to deal with resolving editing conflicts.

The general idea of solving this problem is to divide a page into several parts and edit them separately. In this post we’ll show some tools that can help you tackle this issue by so called sectional editing.

Include Macro

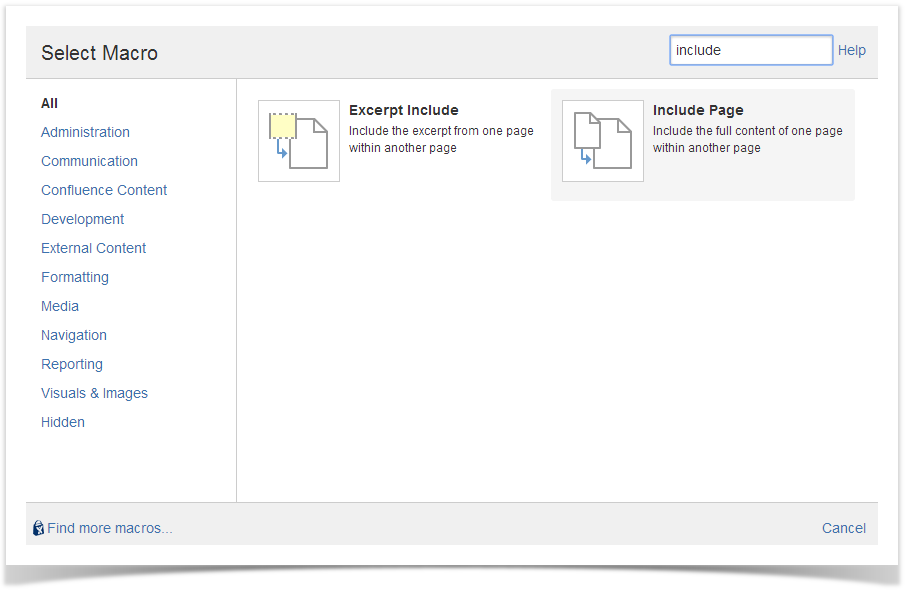
First solution is easy and doesn’t require installing any third-party tools. You need to compose a page of several shorter children pages that can be edited one by one with the macro Include Page that comes preinstalled with Confluence. On your main page locate Include Page in the list of default Confluence macros:

include macro

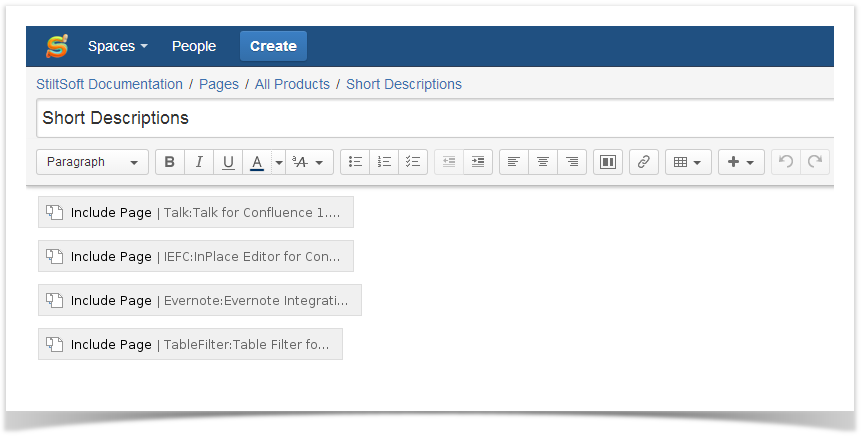
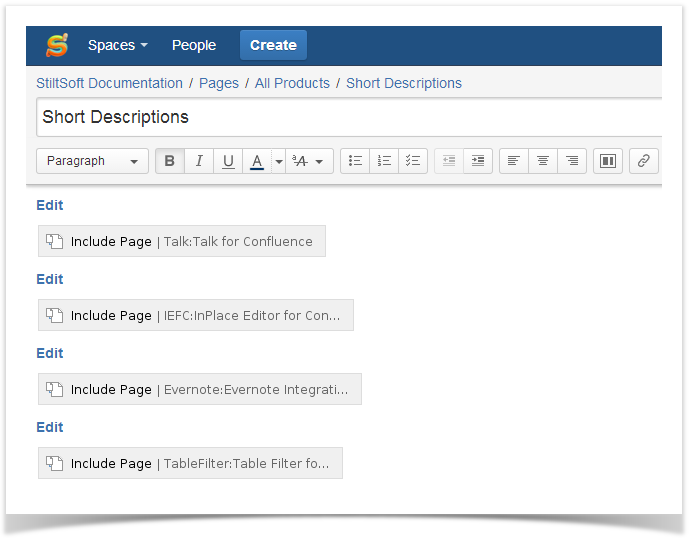
Insert the macro for every page you want to include. When you’re done you main page in the Edit mode will look like this:

include macro edit mode

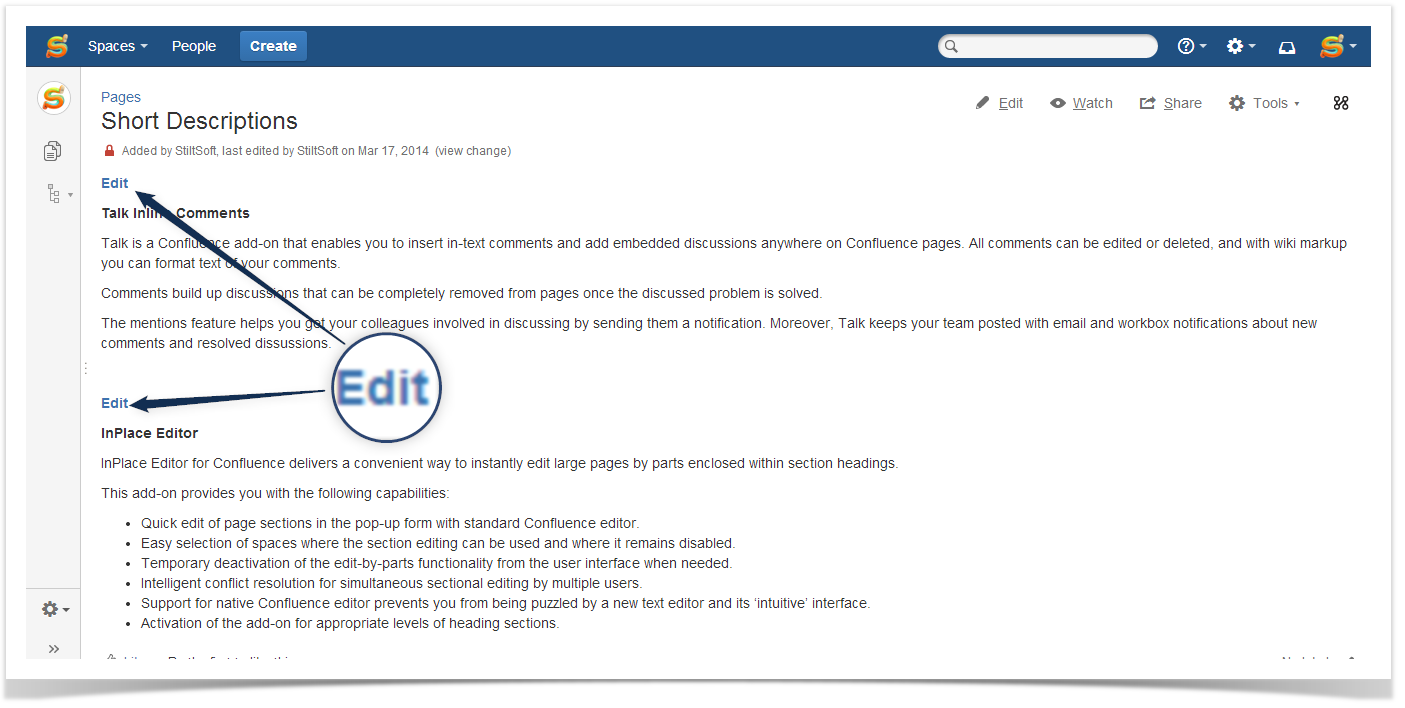
Now, we want to make links that will take us to the Edit mode for every page so that you could quickly start editing a separate page. To do that, go to your children pages’ editors and copy the link from the browser address bar. Then go back to the main page, create a web-link called, for example, Edit and paste the address. It’s important to create a web link, because otherwise Confluence will convert an Edit mode link to a View mode link, and this is not what we want.

Create web links for all children pages and you’ll get something like this:

include macro links

In the View mode you now can click the edit links to jump directly to a page editor.

include macro view mode

This approach, however, has a couple of drawbacks. First, you need to create page sections manually and changing the page layout can be tricky. Second, every time you go to a children page editor you need to navigate back to your main page manually.

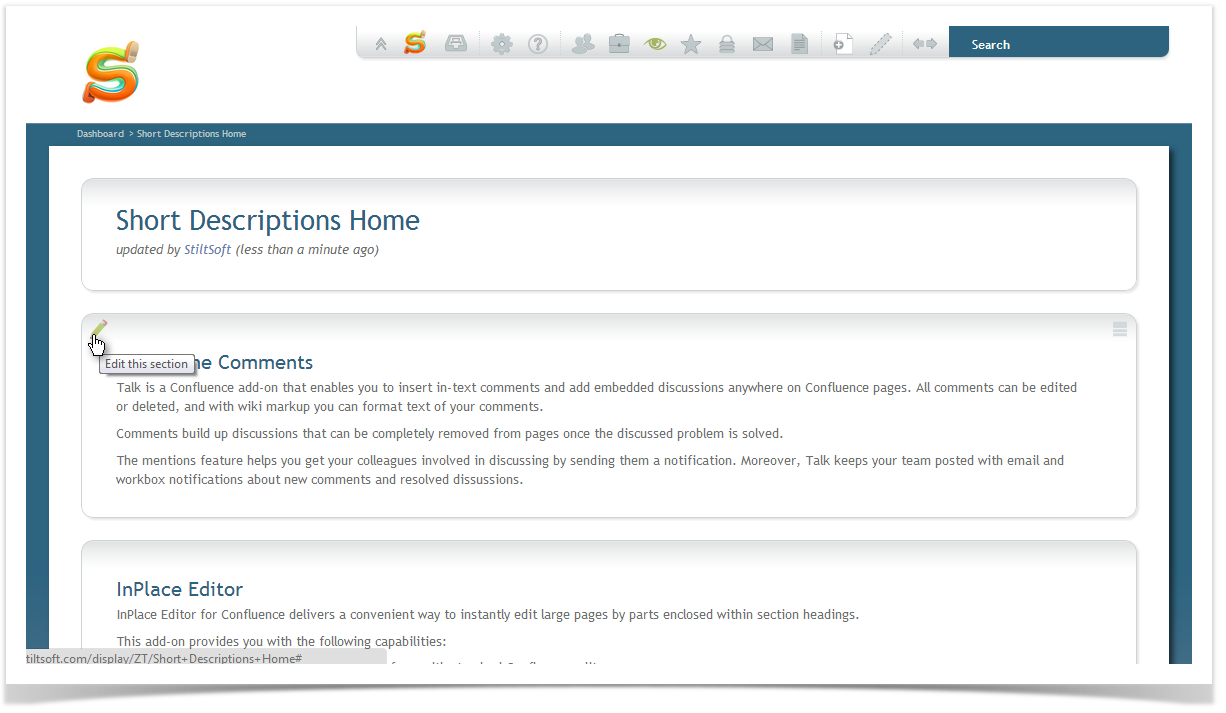
Zen Foundation Theme

This last problem is perfectly solved by using the Zen Foundation theme. It’s a custom theme that lets you easily create page sections and is full of other nice features like a drag&drop layout and flexible permission control.

zen theme

But again, you need to create sections manually, and unless you’re a very small team, the prices can scary you off.

InPlace Editor

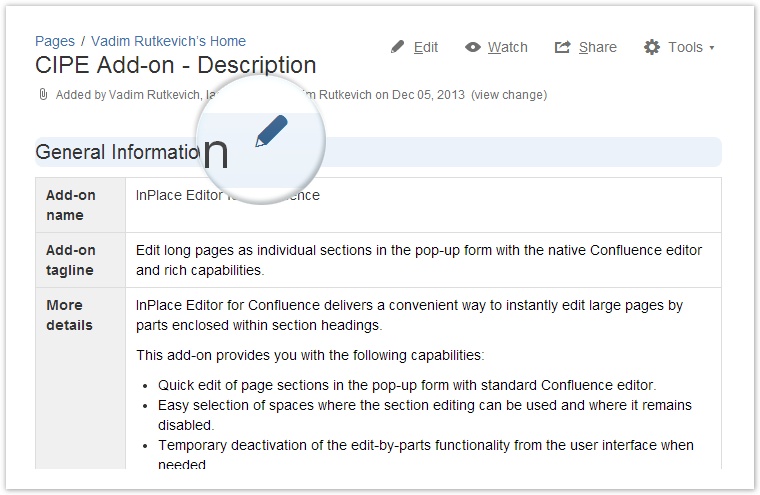
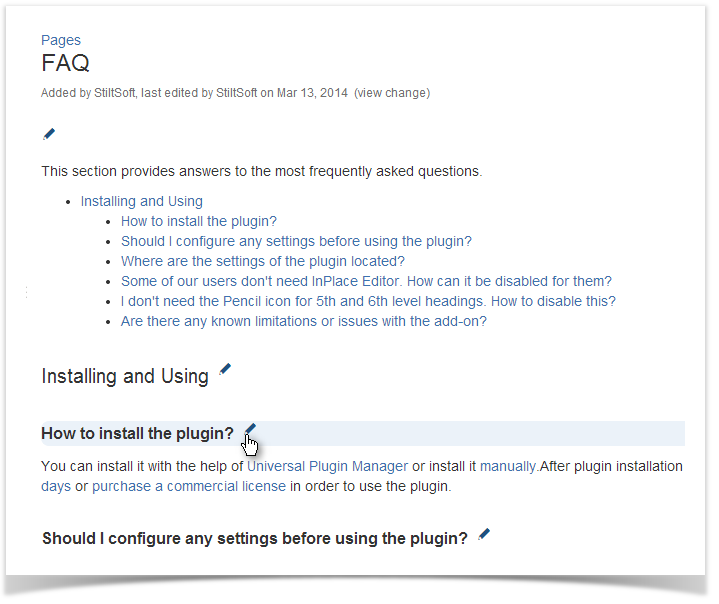
A cheaper and much easier solution is our InPlace Editor. If your page already contains headings, after installing InPlace Editor you’ll see small icons next to each of them.

editing headings in Confluence

Clicking the icon takes you to the native Confluence editor where you can edit only this section alone. Also, if several people are editing different sections of the same page at the same time, you avoid the risk of editing conflicts, since all changes made in different parts are merged. In a rare case when someone is editing the same section as you are, the standard Confluence merge mechanism is invoked upon saving the changes.

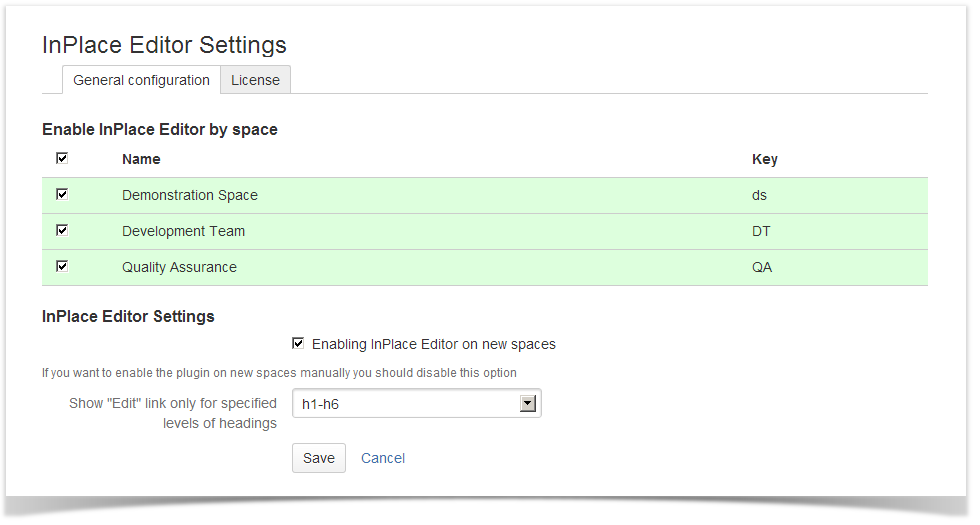
InPlace Editor works out of the box and doesn’t require complex setting up. However, it lets you activate the editor icons only for certain heading levels and disable the add-on completely for selected spaces.

inplace editor settings

To make the editing process even more productive, it would be a good idea to use InPlace Editor along with the default macro Table of Contents. While the former lets you edit a page part, the latter is a nice way to get to this part.

table of contents in Confluence

You can try InPlace Editor in our Live Demo without installing it or generate a 30-day free trial license and evaluate it on your Confluence.