Case Study: Brand-New Theme for Atlassian Confluence

September 6, 2016
#News#Confluence#Case Study
1 min

About Customer

In the late year of 2012 started our cooperation with one Australian company specializing in creation and provision of complex Сloud-based solutions. Data Solutions Group is an IT company with the headquarters in Melbourne, Australia.

Their customer-oriented approach allows them to architect cloud-based infrastructure and re-innovate the existing solutions with the industry-leading technologies. Extensive expertise in Cloud technologies and the status of AWS Advanced Consulting Partner allows them to supply customers with the high-speed, flexible, scalable and reliable Cloud ecosystems.

The necessity to execute only the proven processes and use the situation-applicable methods in Atlassian Confluence made them contact us and add significant updates into their user experience. Confluence was chosen as the tool for easy and convenient team collaboration and quick communication and interaction with their customers. As of that moment, there were some missing features in Confluence that the customer wanted us as Atlassian experts to add.

Continue reading “Case Study: Brand-New Theme for Atlassian Confluence”

Case Study: How M20 Technology uses Confluence for customer and partner relationship management (CRM & PRM)

August 3, 2016
#Confluence#Case Study
12 min

About M20 Technology

M20 Technology, an Atlassian Expert Partner in New York City, helps companies work and collaborate more effectively through the use of Atlassian tools.

Atlassian Confluence is the knowledge base and team collaboration tool of choice for M20 Technology. Over the years they’ve gathered a great load of Confluence best practices for various cases. One of them is managing customer and partner relationships in Confluence.

How M20 built a CRM and PRM in Confluence

As a fast-growing business, M20 recognized the need for customer and partner relationship management (CRM & PRM). They needed an overview of their customers, prospects and partners to help build strong and sustainable relationships with them. For most organizations, such visibility is essential for continued success and growth of a business.

As a business that specializes in building solutions in Confluence, the natural solution was to build it there and here is what it looks like today:

This post covers a simplified solution of what M20 Technology uses today. This version makes it  easier to get started and create a basic framework you can customize and build upon. If you are interested in learning how to build a more comprehensive solution, check out this webinar hosted by ServiceRocket and M20 Technology.

To set up such a system in Confluence, M20 Technology extended their wiki with 4 add-ons:

  • Google Apps Connector by M20 Technology – to connect Confluence with a company’s Google Apps account to retrieve contacts details
  • Reporting and Scaffolding by ServiceRocket – for building a table with contacts of customers and partners on a Confluence page
  • Table Filter and Charts for Confluence by StiltSoft – to dynamically filter the contacts table, e.g. search for a specific contact, find all contacts of a certain type (customer, prospect, or partner) or within a given location, hide columns irrelevant for a current session

It allowed them to create a table with contacts similar to the one below:

This example contacts table includes:

  • 6 columns that are automatically populated with data from a linked Google Apps account: Name, Company, Email, City, State, Phone
  • the Type column, which has a predefined list of options a maintainer of a contacts table needs to manually choose from (customer, prospect, partner)
  • the Notes column, where you can enter any additional contact related information

It’s up to you to decide what columns to use in your own contacts table. You can tune it as you wish by adding new columns (e.g. contact status, job title, LinkedIn profile, lead source) and deleting those you don’t need.

Setting up a contacts table

Let’s see how to configure this contacts table.

To get started:

1. Install the Google Apps ConnectorReportingScaffolding, and Table Filter and Charts for Confluence add-ons.

2. Set up a Google Service account and authorize it in Confluence. Configure Google Apps Connector (see the Administrator Guide for details). If you don’t have a Google Apps account, you can skip this step and proceed by creating a dynamic table. Though you’d need to fill out your table manually adding one row at a time.

Then create a Confluence page for your contacts table and set up a structure of macros on it as described below. It requires some work, but it’s initial configuration that needs to be done only once.

While editing a page, insert a Report Table macro. Inside its body, add a Google Contact Reporter macro. In reporter, specify whether to list contacts from all Google Apps accounts linked to Confluence or only from some of them.

Below the Google Contact Reporter macro, you need to add 8 ‘Report Column’ macros:

1. Title the first Report Column Name. Embed a ‘Report Info’ in it. Set the ‘Report Info’ key to ‘report:item’ and check the ‘Link To Item’ box. It will display the contact’s name and link to the contact’s profile page.


2. The title for the second one is Company. Check the ‘Injected’ box for it. Insert a ‘Report Info’ inside its macro body with the key ‘contact:company’.

3. Next four Report Columns are also injected ones. Meaning you need to check the ‘Injected’ box for them. But they don’t require ‘Report Info’ macros. Insert the following keys in their macro bodies instead:

  • %contact:email% for the Email Report Column (to output the contact’s email address)
  • %contact:work address > address:city%  for the City Report Column (to extract the city property of the contact’s work address)
  • %contact:work address > address:state% for the State Report Column (to display the state of the contact’s work address)
  • %contact:phone% for the Phone Report Column (to render the contact’s phone number)

4. The remaining Report Columns are Type and Notes. Both of them are also injected:

  • Inside the Type Report Column insert a ‘List Data’ macro. Specify a field name for it and choose ‘Select’ as a type option. Then embed 3 ‘List Option’ macros in your ‘List Data’ with values ‘Customer’, ‘Prospect’ and ‘Partner’. This combination of macros will create a drop-down list with contact type options for you to select from
  • And the last Report Column is Notes. Add a ‘Text Data’ macro in its body. Provide a unique field name and select ‘line’ as the type of field. It will display a text field in each contact record for you to type in your notes when working with a report.

Now the configuration of your contacts table is done. It’s time to add filtration to your report. To do that, insert a Table Filter macro on the very top of your page and move the ‘Report Table’ macro with all those macros embedded in it inside Table Filter.

You can set up your filters right here while editing a page or later when viewing your table. Let’s first save the page, see our contacts, and then get back to filtration.

Ta-dah. We’ve got a table with all our Google Apps account contact details right in Confluence.

Initially Type and Notes columns are empty. To work with them, click the ‘Edit Contents’ button on the page. You’ll have your table displayed in a window, where you can select a contact type in a drop-down menu and enter text in the ‘Notes’ field.

Filtering and finding contacts

Your contact database is ready for you to work with. There is a variety of filters that will help you search, filter and analyze your massive contacts report. In this example we’ll use 4 of them:

  • Global filter to search in all columns of a table
  • ‘Company’ free text filter for search by Company name
  • ‘Type’ drop-down filter to filter by contact type, e.g. to see only prospects
  • Hide columns filter to select what columns are not important for your current goals and should be hidden

You can add filters and make changes in your filtration panel right in the View mode.

And have your report dynamically updated when you apply filters.

Moreover, you can create pivot tables and illustrative charts to get a summary of your contact table and analyze your contact list.

It’s incredibly convenient to manage your contacts in the platform where your collaboration happens. Hoping this detailed step-by-step guide makes it easy for you to set up CRM and PRM in your Confluence. And another amazing thing is that there are so many other ways your teams can benefit from add-ons used in this solution. So go ahead and try it!

Start your free trial of add-ons for Confluence used in this solution today:

Visualizing Jira Data in Confluence: Round 2

June 2, 2016
#Confluence#Jira#Reporting#Analytics#Integration#How To
11 min

Some time has passed since the publication of our first post about the way to visualize Jira data in Atlassian Confluence with Table Filter and Charts add-on. The development of the add-on has not stopped, so since the previous blog post, it has received new features that will allow you to more efficiently work with table data.

In this article, we will show you how you can apply the newly added feature – two-dimensional pivot tables – for creating reports on Jira data in Confluence.

Showing Jira data in Confluence

To output data in Confluence from Jira, you need to configure an application link.

When complete all you need to do is to create a page and insert the Jira macro on it. Within the Jira Issue macro, you can either insert the appropriate JQL query to fetch issues from Jira instance. Otherwise, you can use the pre-defined filters and enter the filter name into the corresponding field. You can also define the additional information showed for issues in the table.

confluence_jira_issues_macro_configurationAs a result, you will get a table with Jira issues when you save the page. But if you decide to filter these issues in Confluence, you will find a problem with it. Yes, you are right. There are no tools in Confluence for data filtration.

Filtration, Pivot Tables and Charts in one tool

So what you can do with the list of your Jira issues? Of course, you can update the JQL query, add new parameters, limit the date ranges or enumerate assignees, and so on.

But is it possible to do this without performing any manipulations with the initial table with issues? Yes, and you can do this with Table Filter and Charts add-on. What capabilities does this add-on give you?

The add-on bundles a set of the three macros:

  • Table Filter macro allows you to add dropdown, free text, date range, number range, and icon filters. So you will be always able to filter data of any type in Confluence.
  • Pivot Table macro allows you to summarize your table and aggregate it against specific values.
  • Chart from Table macro allows you to visualize your table data with the set of available charts and graphs.

All these macros allow you to quickly change their settings while viewing the page and save them in the macro bodies. Data is updated automatically once you update the settings or the data source returns updated data.

So what should you do? Just insert your table or the macro outputting table data into one or multiple macros of Table Filter and Charts add-on. And you’re done.

confluence_table_filter_pivot_table_chart_from_table_macros

Getting Insights into Your Jira Data

So let’s save the page and see what we can do with Jira issues.

We have created the application link to jira.atlassian.com and we want to see the list of issues that have been created since the beginning of the year and their breakdown by component and resolution status. So we use the following JQL query to get the raw list of Jira issues:


project = "JIRA Software (including JIRA Agile)" AND createdDate > startOfYear()


Our list includes 477 issues that relate to Jira Software project.

So our combination of macros generates the pivot table, that you can further filter with the pane. We decided to limit the issues created only in the first quarter of 2016.

confluence_pivot_table_jira_issuesAggregation is performed against project components and resolution status. You can quickly switch aggregation in your two-dimensional pivot table against any other parameter.

The Chart from Table macro allows you to visualize the table with aggregated values with the help of the stacked bar chart.

confluence_generated_chart_from_tableThis macro allows you to select the table columns for chart generation. You can also disable particular parameters from showing in the chart by clicking the corresponding values in the legend. You can always quickly change the data series to another one. You can view the results and try to modify its parameters here.

For example, we want to see the distribution of issues by assignee and issue status, and exclude all unassigned issues and see the amount of completed work by particular employees.

confluence_pivot_table_with_jira_issuesWe choose the column chart to visualize the distribution of issues in the breakdown by assignee and issue status. You can try this case here.

confluence_chart_visualization_jira_issuesAnd the last case, that we are interested in the number of issues aggregated against status and resolution with the number of watchers greater than five.

confluence_jira_issues_chart_filtration_pivot_tableSo we add the number range filter for the Watchers column and set here ‘5’ as the minimal number of watchers for the issues to include. The pivot table and the column chart showing the distribution of issues are generated automatically.

Benefits

Table Filter and Charts app allows you to add more interactivity to your work. Now you can forget for the continuous page edits, just place the Jira macro within the bundled macros and manipulate data the way you want it. This add-on can become a real alternative to Jira Charts macro, or for eazyBI Reports and Charts and Arsenale Dataplane Reports add-ons. Explore your issue data from Jira on Confluence pages and share it with your colleagues with much ease.

Case Study: Keeping Business Contacts in CRM within Confluence

January 27, 2016
#Confluence#Case Study
8 min

The overall perception of the collaboration with StiltSoft can be summarized in the word “professionalism”. We were able to establish a very agile approach with a high response rate (within a few hours). Together, we created the requirements for the final product in a very straight forward process. StiltSoft provided valuable input to the value proposition of the product as well as structure to the development process. The final piece of software is well documented and has been thoroughly tested by StiltSoft and us. Most important: the final product meets the requirements, we defined at first.

P. Eckelmann, Eckelmann AG

About the Customer

We completed an interesting custom project for Philipp Eckelmann, the representative of Eckelmann AG company. This company specializes in machine and system engineering, including development of cooling technologies and automation software. The company was founded in 1977 at the start of automation engineering era. They manufacture the wide range of tools from compact device controls and to full-fledged and completely automated industrial systems.

The key manufactured solutions for enterprise include:

  • Hard­ware and soft­ware for ma­chine au­toma­tion
  • Reg­u­la­tion and con­trol sys­tems for com­mer­cial cool­ing sys­tems and build­ing tech­nol­o­gy
  • Sys­tem in­te­gra­tion and soft­ware de­vel­op­ment for sys­tem au­toma­tion

The highest quality, usage of the proven industry standards, adaptation of the newest technologies allow the company to be one of the leaders in enterprise solution systems in European Union. A rich set of tools and services, customer attention and innovative technologies drive the continuous growth and development of the company.

Project Overview

The customer uses Confluence as a team collaboration platform for sharing information about new projects and tracking the meeting protocols. The sales team writes short protocols after meeting with customer for outlining the project and its requirements. While writing a protocol, they need to mention customers in description of business trips or meetings. For the continuous tracking of customers and viewing where they were already mentioned they needed some tool that will keep track of this information. So the manager will be able to view the whole list of pages where a specific business contact was mentioned.

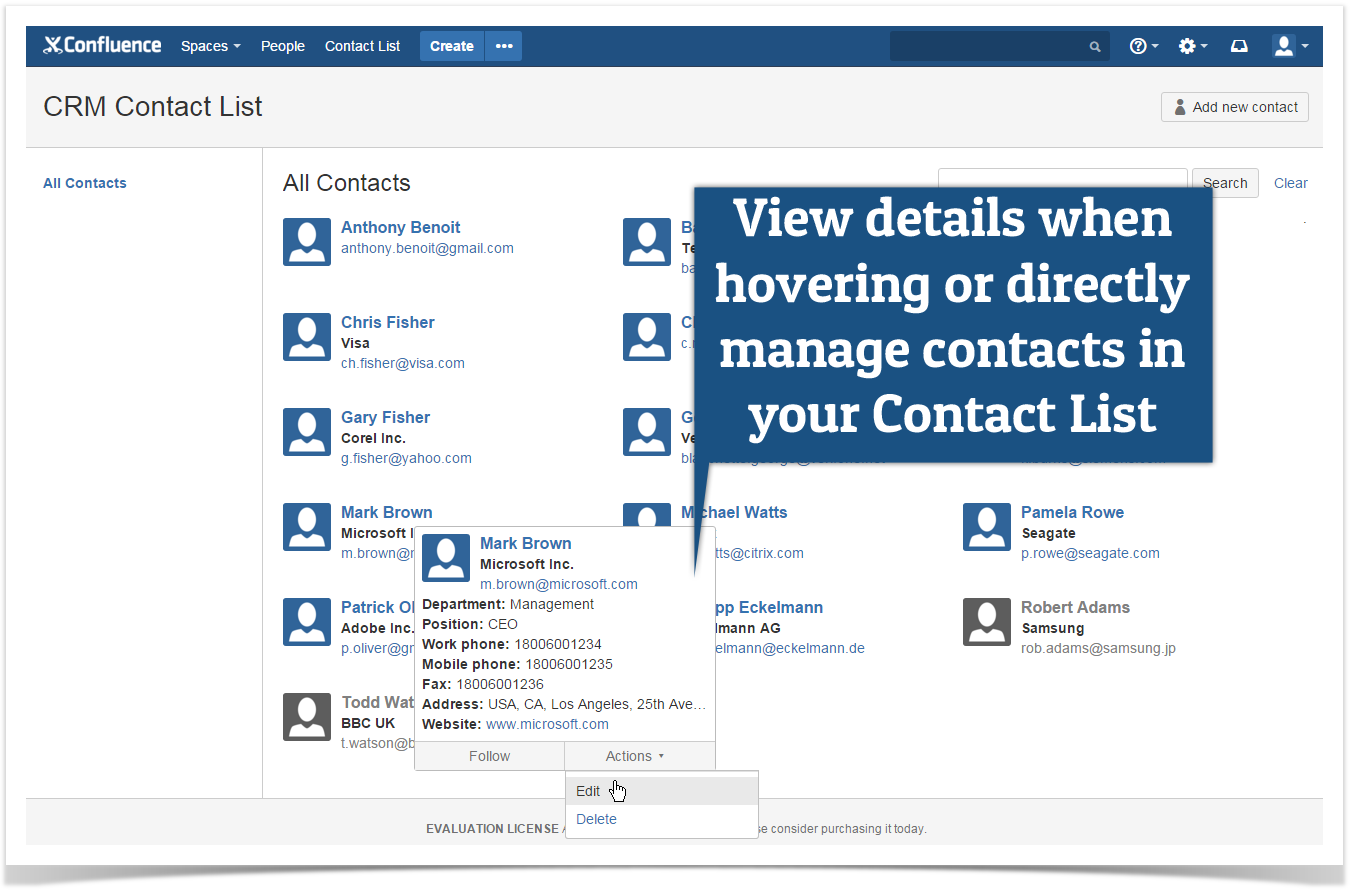
Within the project scope, we had to create the separate section where the customer could manage contacts and perform basic operations, such as creation of new contacts, editing contact details or deleting contacts. For each contact, the customer wanted to specify the contact information, such as email, company, position, address, contact phones and so on. Once added, Confluence users can mention business contacts on Confluence pages the way similar to the one for user mentioning in Confluence.

Managers can instantly see where the particular contact was mentioned on the page and browse the other pages for viewing details of meetings with this business contact. Additionally, the customer needed a way to differentiate access to management of contact details and viewing contact details. All this functionality and other enhancements were completed by our company, so let’s see the project in details.

Management of Contacts in Confluence

After installation, the add-on adds the Contact List item into the Confluence menu, so users can quickly access the list of contacts and manage them. All contacts are shown as a grid, you can easily browse the available contacts and perform basic operations on them, such as adding contacts, editing or deleting them. The removed contacts are not removed from Contact List forever, they are just grayed out you can always restore them. Contacts that have been mentioned there prior to deletion will remain on the pages.

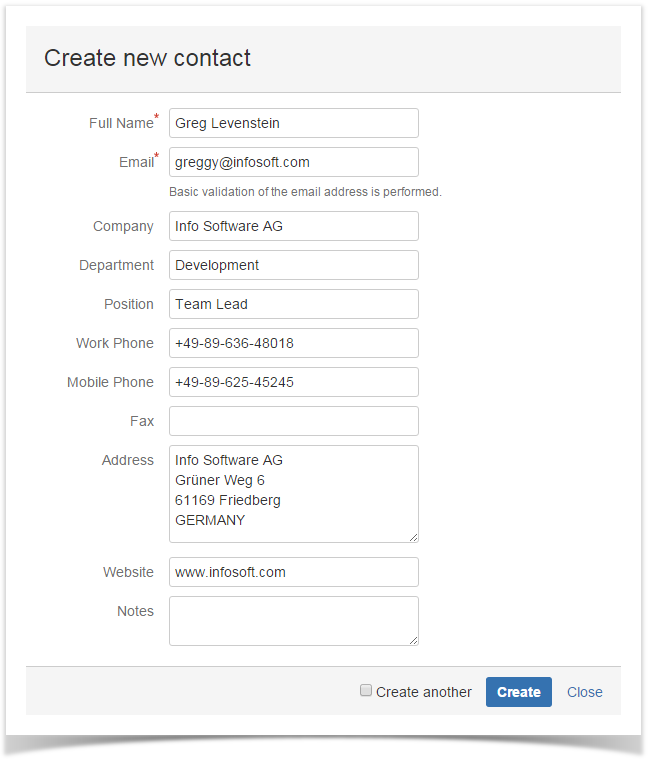
Creation of contact is performed in the pop-up form, you can specify all the required information about the contact and leave the optional notes, as well.

contact creation form in Confluence

Additionally. you can search for business contacts by name, email or company name.

Mentioning Contacts on Confluence Pages

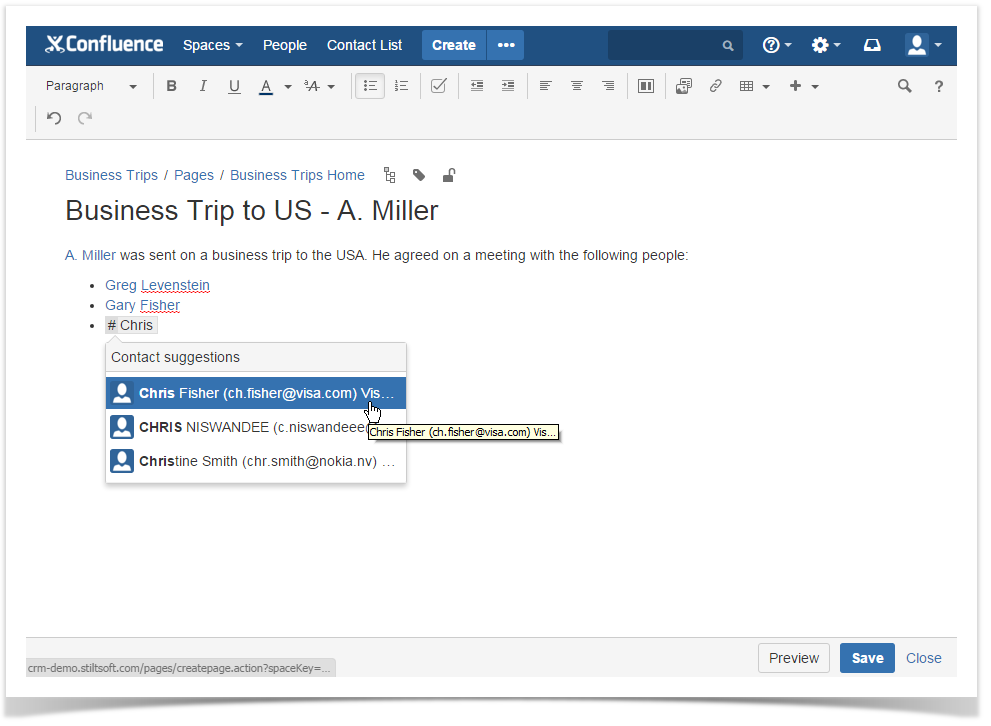
While creating or editing Confluence pages, you can add mentions of your business contacts by typing # following name, email or company name. The add-on automatically fetches the list of contacts matching the entered text snippet and prompts you to select the appropriate contact.

confluence page contact mentioning

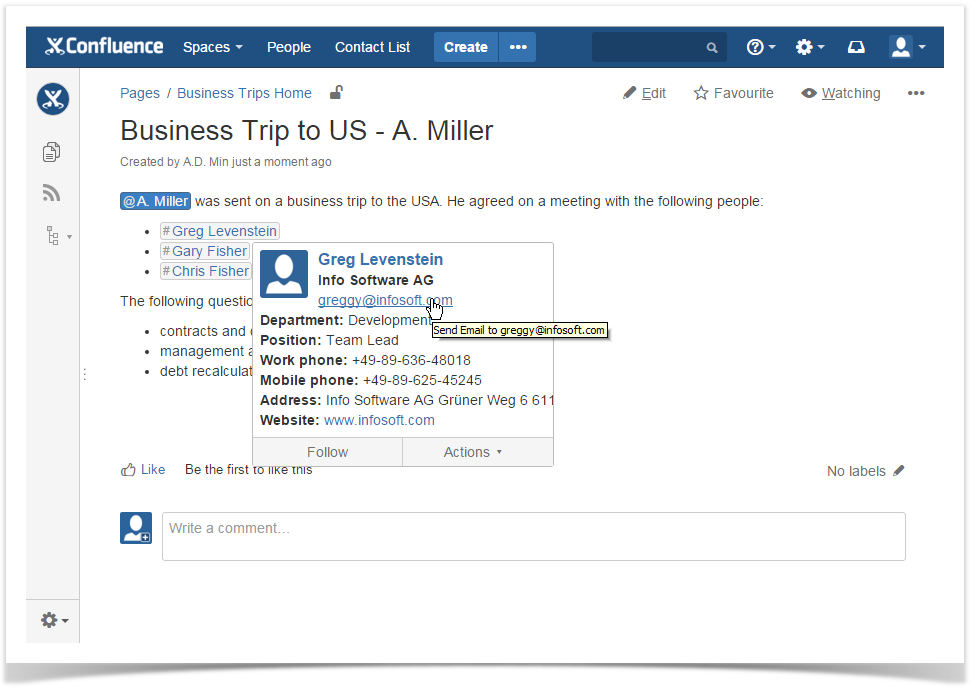
After saving the page, contacts are displayed similar to user mentions. Once your colleagues hover over the contact, they can view contact details.

contact details in Confluence

Viewing the List of Pages with Contact Mentions

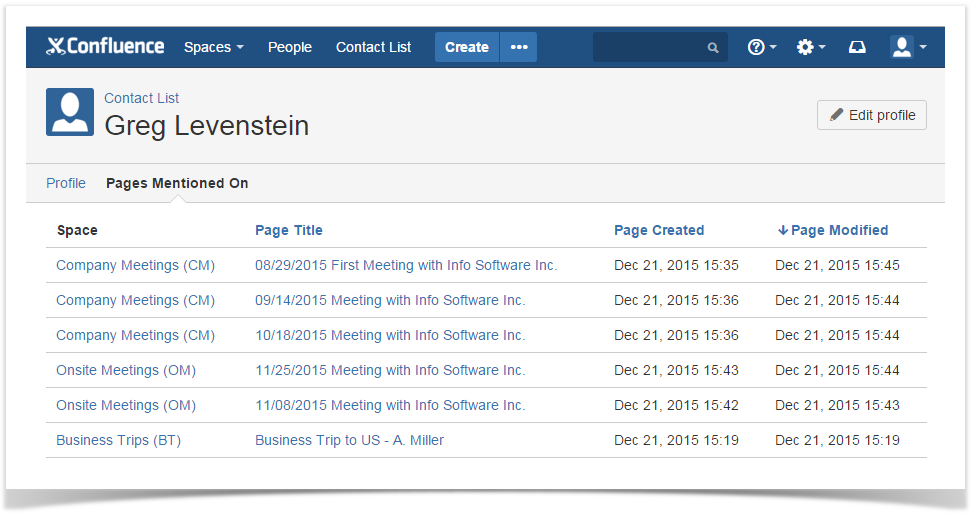
While viewing the contact on the page or in Contact List, you or your colleagues can open the page that lists all Confluence pages where this contact was mentioned.

Contacts can be sorted by page title, page creation or modification date. Right from here, you can proceed to the contact’s details or edit the profile. When clicking a particular Confluence page, you will be redirected to the first mention of the contact on the page, so you can instantly see the contact in the context without scrolling the page and looking for the contact.

Configuration of the Add-on

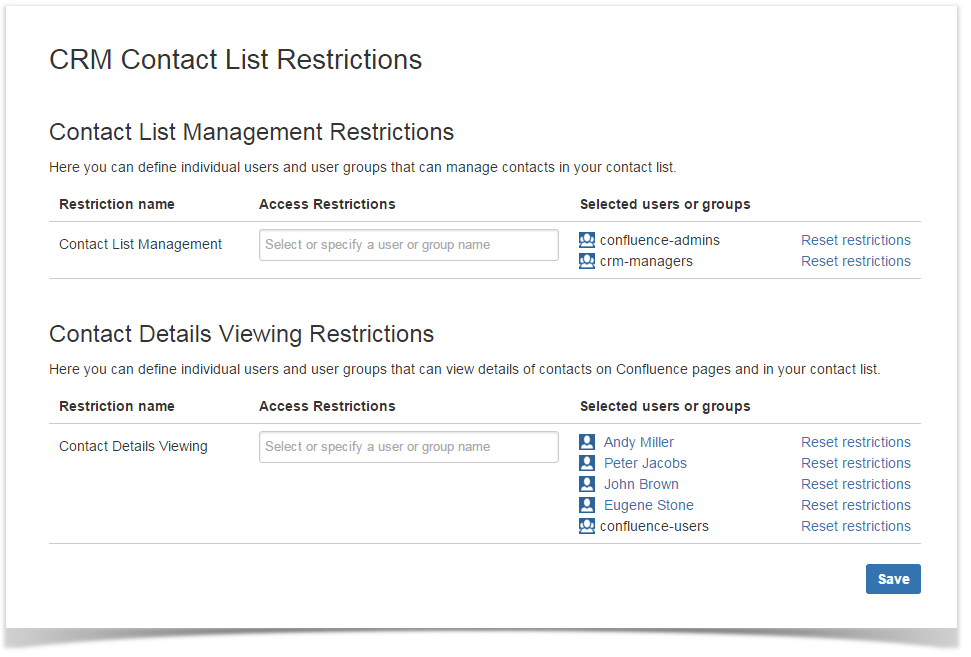
Management of the add-on’s settings is pretty simple and will not take much time of yours. All you need is just to enter the list of users and user groups who can manage Contact List and view details of contacts.

Users who are not allowed to manage contacts can only view the list of contacts without a capability to edit or delete them. If viewing the contact details is not allowed for users, so only the full name of the contact will be shown on Confluence pages and in Contact List for these people.

Project Results

This custom project set a range of challenges of how to preserve the native Confluence experience and provide the user-friendly interface for efficient management of CRM listing in Confluence. We used the design and user workflow patterns available in Confluence so the customer can do a quick start with the add-on.

We hope that the add-on will simplify the customer’s work with business contacts in Confluence and will save him and his employees a bit of time on inserting mentions of business contacts. The existing solution brings all the necessary features for keeping a consistent list of business contacts and keeping track of any meetings or business trips for discussion of company issues with this or that customer.

How to encrypt your Confluence or JIRA server disk

January 6, 2016
#How To#Confluence#Jira
7 min

Why do you need to encrypt your Confluence or JIRA server disk?

Confluence and JIRA usually contain confidential information which can be commercially sensitive information or just your private data (of course, you don’t want to share it with other people). Data protection against loss and unauthorized access can be achieved by managing user access and using the TLS encryption protocol for accessing your Confluence and JIRA servers. Disk encryption helps to protect your data even if your server (especially if you use a virtual server) or its disks were stolen.

How to encrypt a disk in Linux

A lot of Linux distributives offer disk encryption (or user home directory encryption) during installation. But sometimes you need to encrypt your disks after installation, or you need to encrypt only one of your disks – in this case the unencrypted data can be used before your administrator enters the password to decrypt the encrypted data (this procedure is usually required after the server reboot).  .

We’ll use LUKS to encrypt one disk on the server. You need to install a cryptsetup package on your Linux server, if it is not installed yet:

apt-get install cryptsetup

or

yum apt-get install cryptsetup

If you’re reusing a disk (here and below in this article it will be ‘sdb’) that contained important data, you can rewrite your disk with random data to destroy the information on it:

dd if=/dev/urandom of=/dev/sdb

Let’s enable the /dev/sdb encryption. This irretrievably destroys all data on the disk:

cryptsetup luksFormat /dev/sdb

You need to confirm your actions by entering YES in the uppercase:

Then, you need to enter the password for the /dev/sdb decryption.

All data on /dev/sdb will be encrypted starting from this moment. But you also need to create a file system to start using an encrypted device on your server.
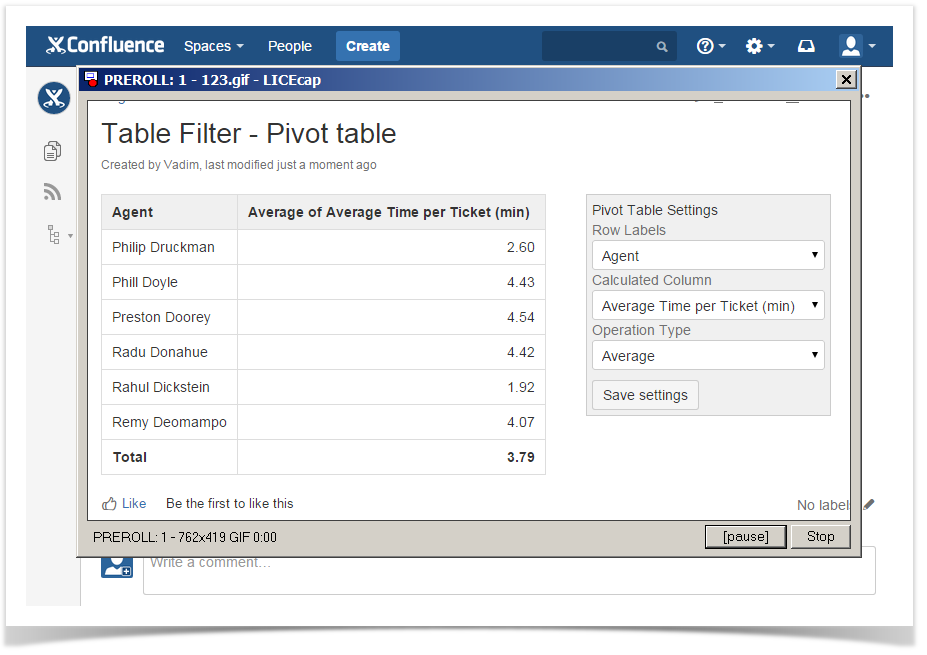
How to prepare an encrypted disk to use it on server

You need to open an encrypted device:

cryptsetup luksOpen /dev/sdb storage

where ‘storage’ is the device name that will be used in the system (/dev/mapper/storage). You need to enter the decryption password at this step.
Let’s format the disk before the first use:

mke2fs -j /dev/mapper/storage

You need a mount point to use the disk. Let’s create it:

mkdir /storage

After that, just mount your drive and start using it.

mount /dev/mapper/storage /storage

What happens after server reboot?

After reboot, your /dev/sdb will be unmounted and encrypted. You need the commands below to decrypt and mount your drive and start working with it:

cryptsetup luksOpen /dev/sdb storage
mount /dev/mapper/storage /storage

The drive will be decrypted, mounted and ready to go.

How to encrypt Confluence or JIRA data

If you want to encrypt your Confluence or JIRA instance, you just need to install them into the /storage directory, also you need to place the Confluence or JIRA home directory there as well. If your instance is already installed – you can move your Confluence or JIRA files into /storage and change the startup scripts settings and Confluence or JIRA home settings in configuration. Your data will be encrypted. Don’t forget to set up correct user permissions for the moved files using ‘chown’.

Please note that a significant part of settings and all text content of your Confluence or JIRA instance are located in the database. The file system of your server contains major Confluence or JIRA system settings, attachments, exported data and backups. To be sure your instance is fully protected, you need to setup your database encryption. The most popular databases (MySQLPostgreSQLOracleSQL Server) support encryption to protect your data.

Some automation magic

It is insecure to set up automatic disk decryption and mounting, but it is annoying to enter a lot of commands in server console every time after restart. This problem can be solved by simple actions:

  • disable automatic startup for all services that use an encrypted drive (Confluence, JIRA and so on)
  • create a simple script to decrypt and mount the drive with data and starting related services (below you can see an example script to decrypt and mount the drive into /storage and then start Confluence and JIRA instances)
cryptsetup luksOpen /dev/sdb storage
mount /dev/mapper/storage /storage
/etc/init.d/confluence start
/etc/init.d/jira start

Such script can simplify the start process for your encrypted Confluence or JIRA instances after the server reboot. You just start the script and enter your drive decryption password, and the automation magic does the rest.

Sponsored Development: How We Improved No Email Storm Add-on

October 2, 2015
#Confluence
5 min

Mercy Ships uses Confluence as a way to collaborate between our 16 offices around the world and our Hospital Ship off the coast of Africa. Keeping informed and aware of documentation, processes, and policies is crucial in our work. StiltSoft’s No Email Storm has made it easier for our users to Save & Notify watchers when important changes are being made and Save for repeated or minor changes reducing the unnecessary and overwhelming notifications in each person’s inbox. In addition, StiltSoft worked with us to make a minor change to their product that made it an even better tool for us. Thank you StiltSoft for a great and easy to use product and for being very helpful and responsive in your services!

Michelle Vincent,
Mercy Ships

Release of No Email Storm 2.1.0 has been coordinated with Mercy Ships organization that requested a change in the user exeperience of the add-on. The client wanted to have a capability to alternate the prominence of Save and Save & Notify buttons in Confluence editor. Our company willingly provides the options of crowdfunding and sponsored development, but for this organization the requested functionality was added for free as a bit of help from our side for their noble activities. Our company will also appreciate if users of No Email Storm make small donations to Mercy Ships organization as these people are doing really great things.

About the Customer

Mercy Ships uses hospital ships to deliver free, world-class healthcare services, capacity building and sustainable development to those without access in the developing world. Founded in 1978 by Don and Deyon Stephens, Mercy Ships has worked in more than 70 countries providing services valued at more than $1 billion, treating more than 2.5 million direct beneficiaries. Each year Mercy Ships has more than 1,600 volunteers from more than 40 nations. Professionals including surgeons, dentists, nurses, healthcare trainers, teachers, cooks, seamen, engineers, and agriculturalists donate their time and skills to the effort. Mercy Ships seeks to transform individuals and serve nations one at a time. For more information click on https://www.mercyships.org/.

Details of the Release

As everybody knows, No Email Storm was created to allow better user experience while saving the page with minor updates that are not needed to share with the rest of the team through email notifications.

The current release of the add-on was decided to make public and available in the Marketplace as we at StiltSoft think that this new feature will be in-demand. So what was actually added and updated?

The configuration section of the add-on has received a new option to set the primary button for Confluence editor. So if you deal with thousands of Confluence pages, but you only add light corrections and updates so you woud not like to distract other colleagues of yours with the constant stream of notifications about added letter or corrected word. Using the native Notify Watchers option is quite inconvenient as you need all the time not to forget check or uncheck it depending on the updates you added.

With the current release of the add-on you can select which button to make prominent in Confluence editor. The other thing about this is that the key combination Ctrl + S is automatically mapped to this prominent button. So if you are a fan of hotkeys but you do not want to notify page watchers, you can set the Save button as pominent and keep pressing Ctrl + S keys for saving pages. No notifications will be sent in this case.

If you always want everybody to be updated on the page updates you made, select the Save & Notify button as prominent.

Want new functionality in our add-on in the nearest time? Send the request to us and we will discuss details of this custom enhancement with you.